Third Person Action Adventure Level Blockout
Third person action level blockout inspired by Uncharted, built in Unreal Engine 5. You play as an explorer on a mission to recover an ancient treasure for your brother. To succeed, you’ll explore treacherous environments, climb walls and ledges, fight enemies, and solve clever puzzles, using both skill and strategy to make your way through the level
Create a dynamic and immersive level that combined exploration, combat, traversal, puzzles, and cinematic moments into a cohesive experience. Built around distinct gameplay beats that guide pacing and player progression.
Unreal Engine 5
Third person action adventure
4 months
Solo project
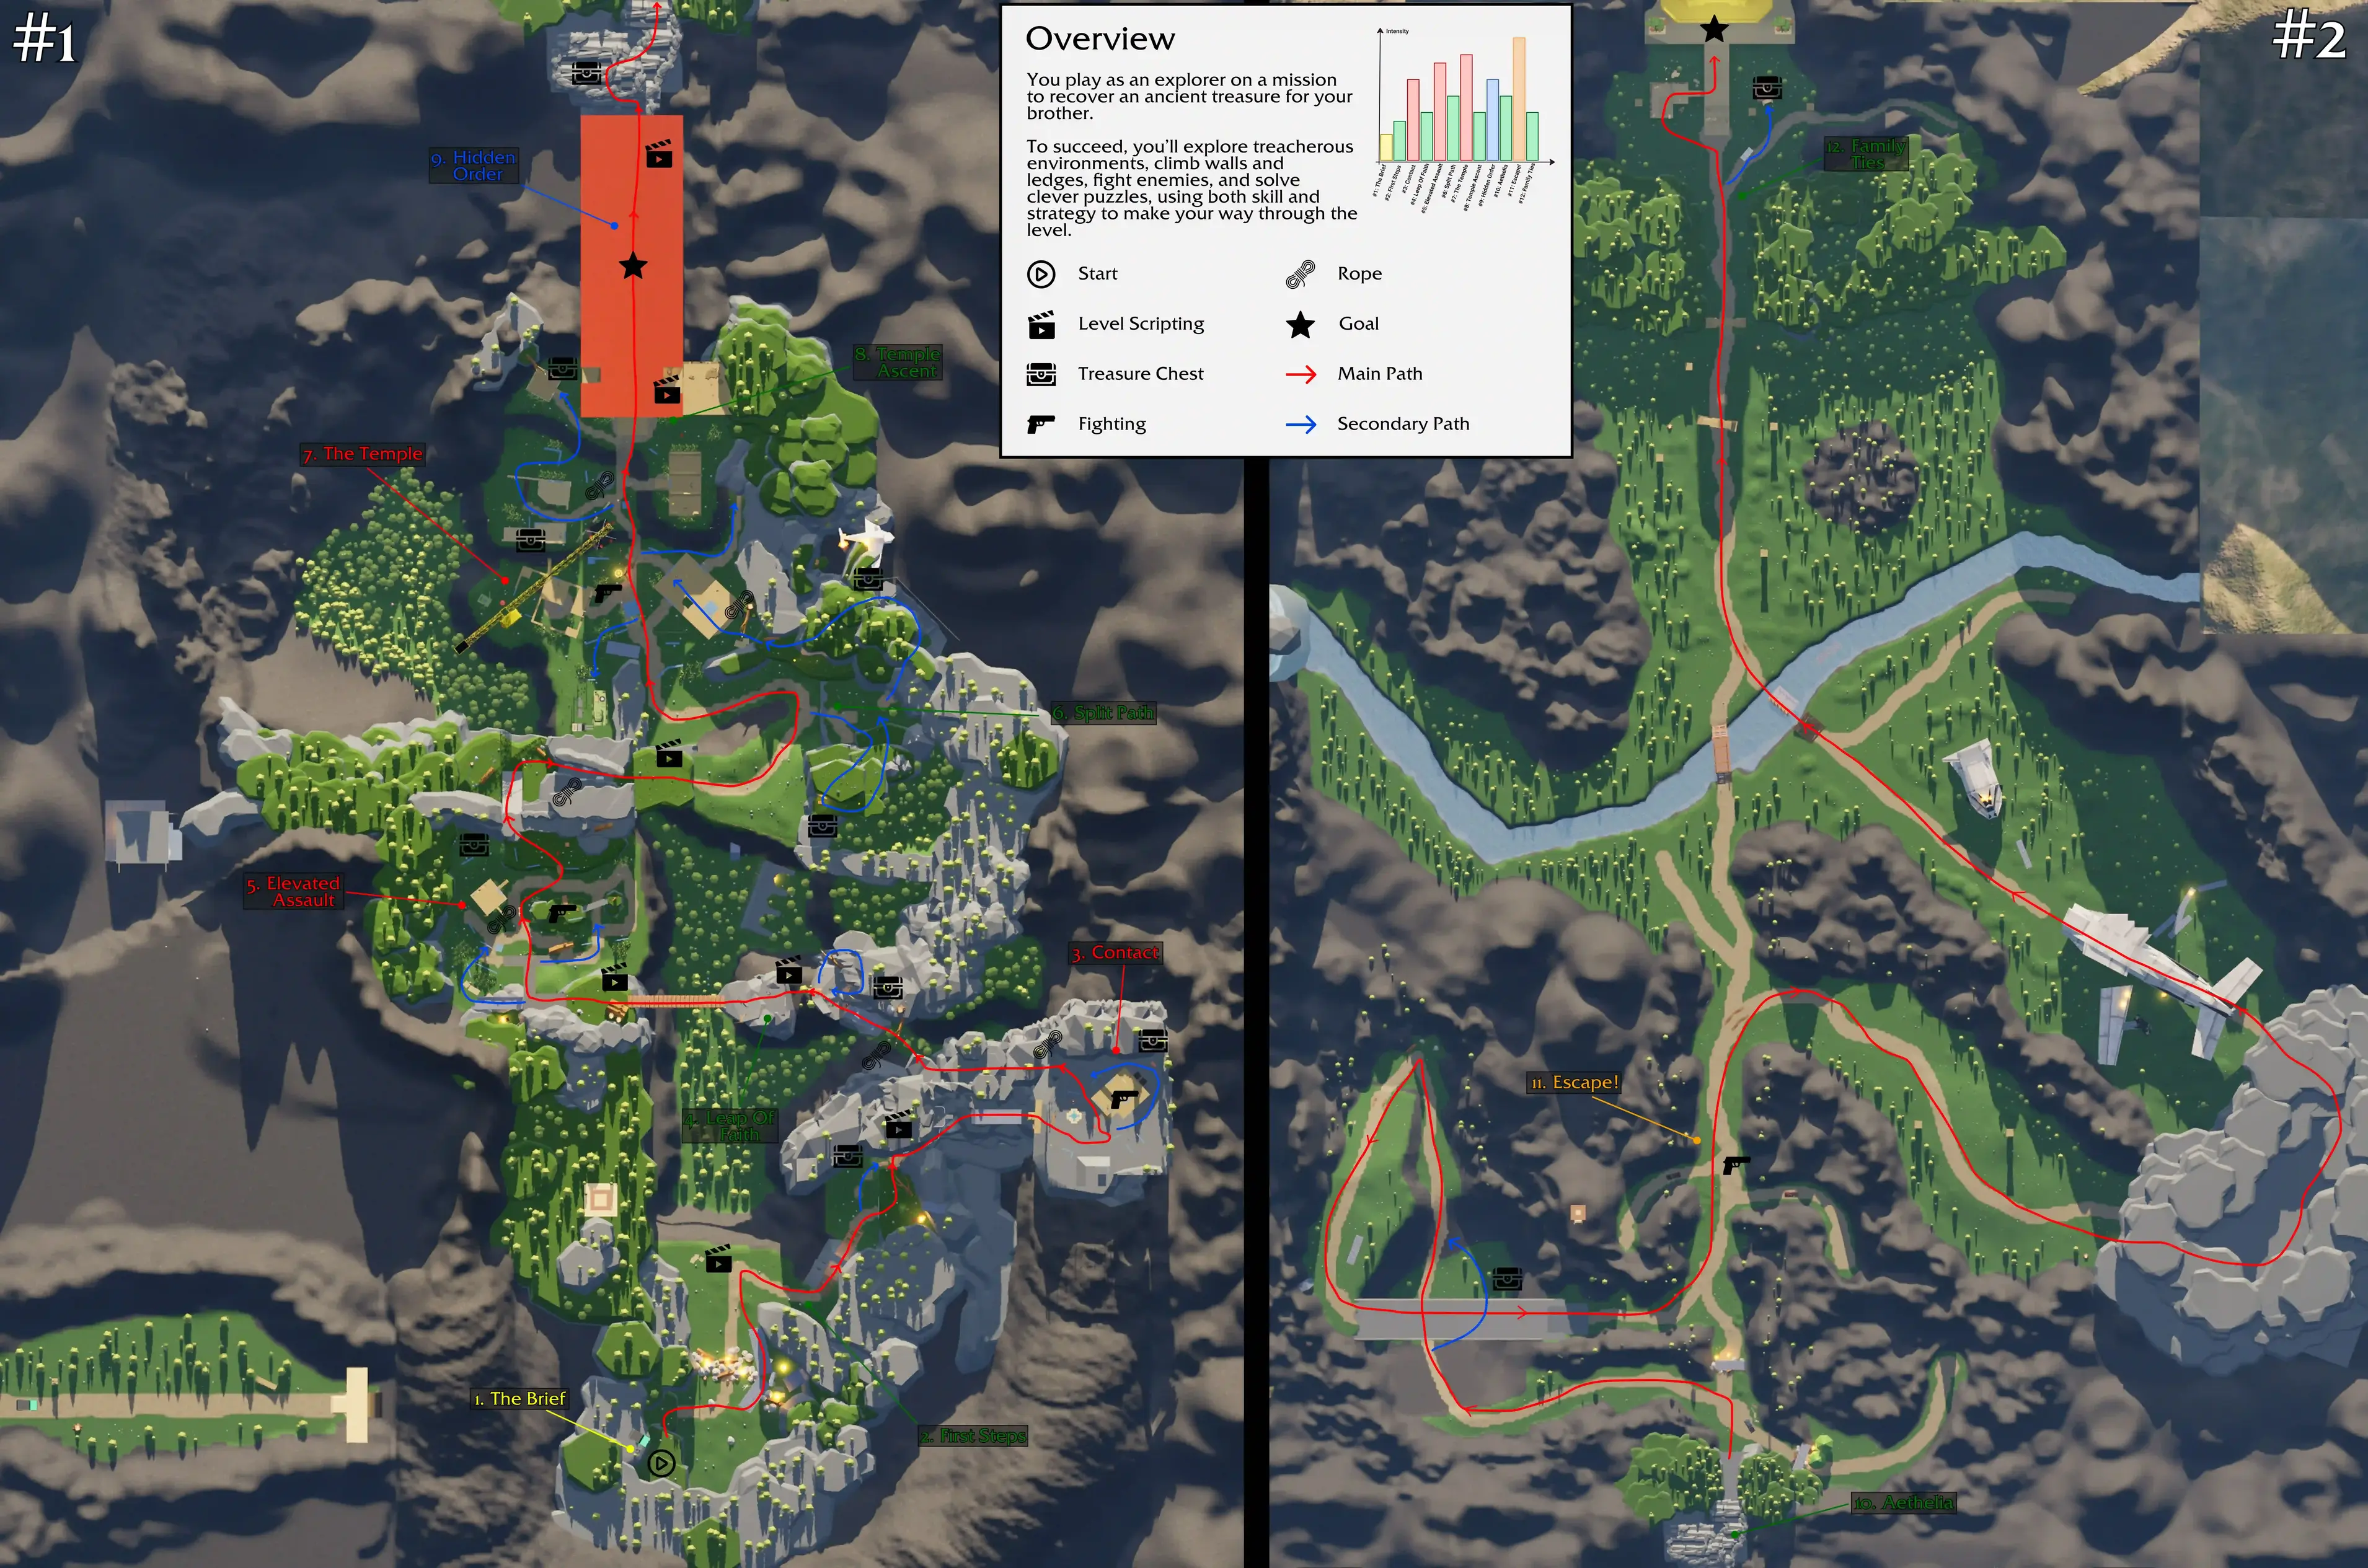
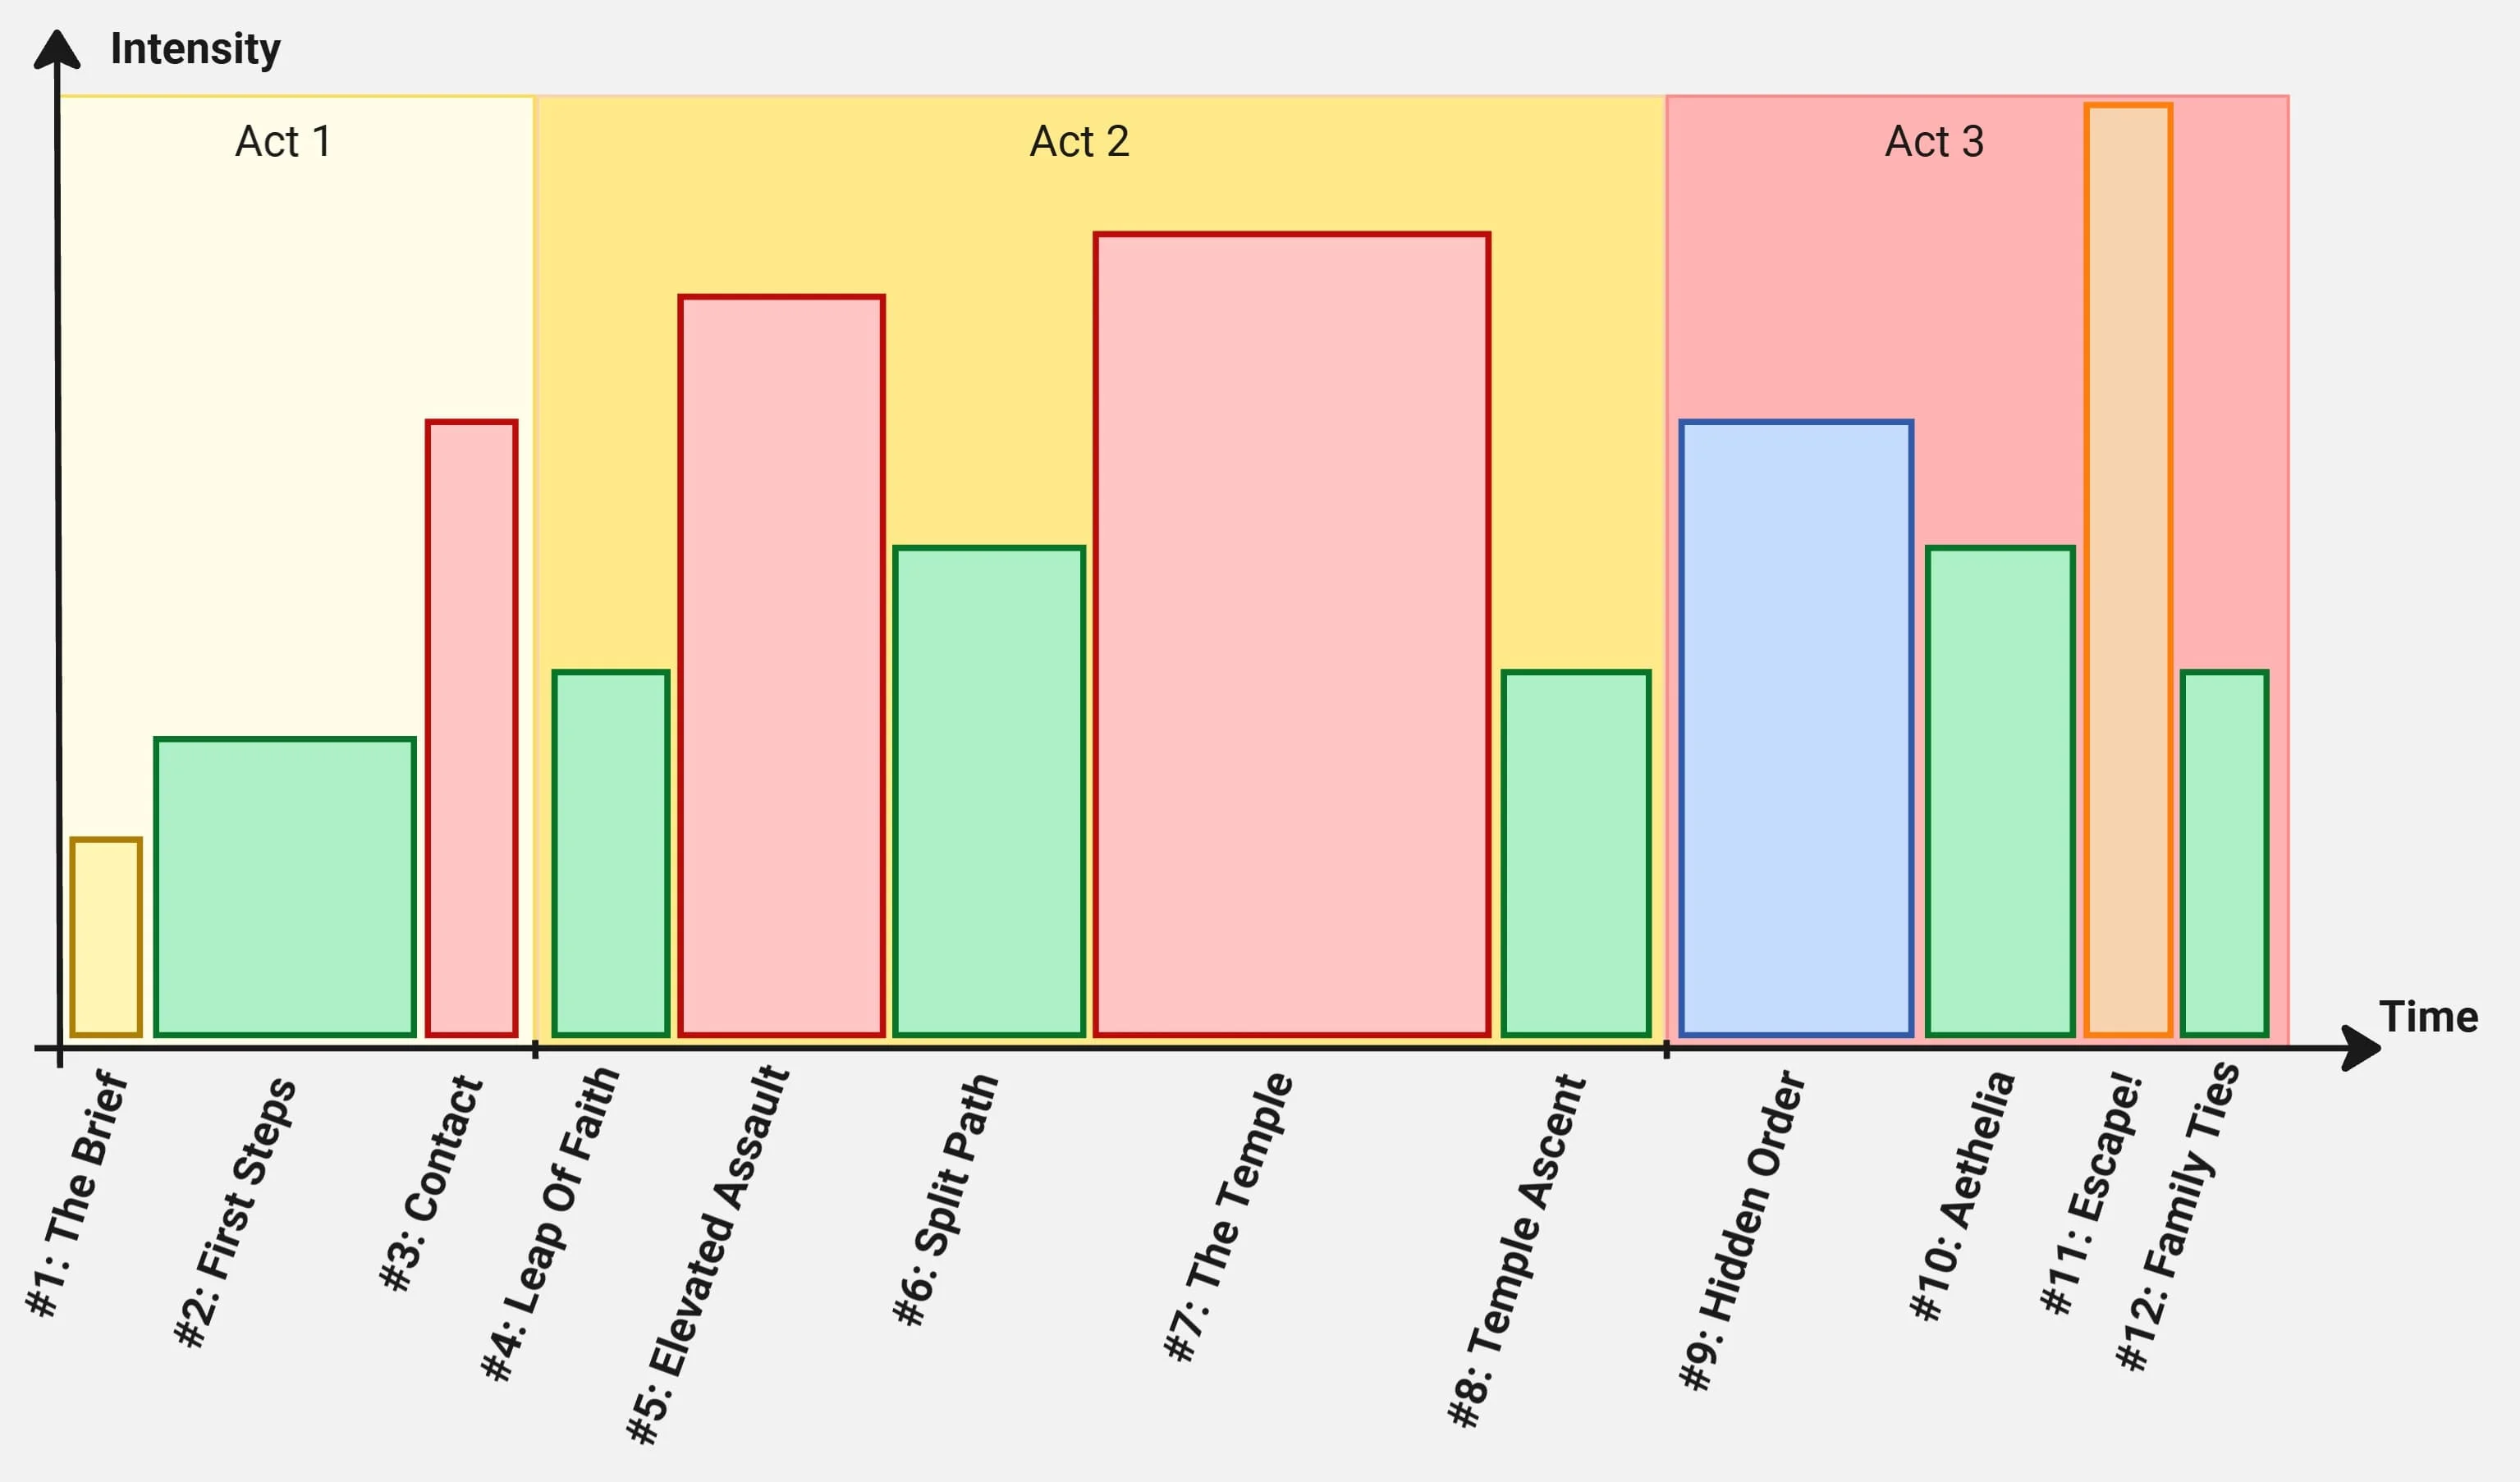
A cinematic sequence introduces the mission briefing: recover an ancient treasure and deliver it to your brother while maintaining radio contact. It establishes the game’s world and tone, showcasing ongoing explosions and making it clear that the entire area is an active conflict zone.
Intensity = 2/10
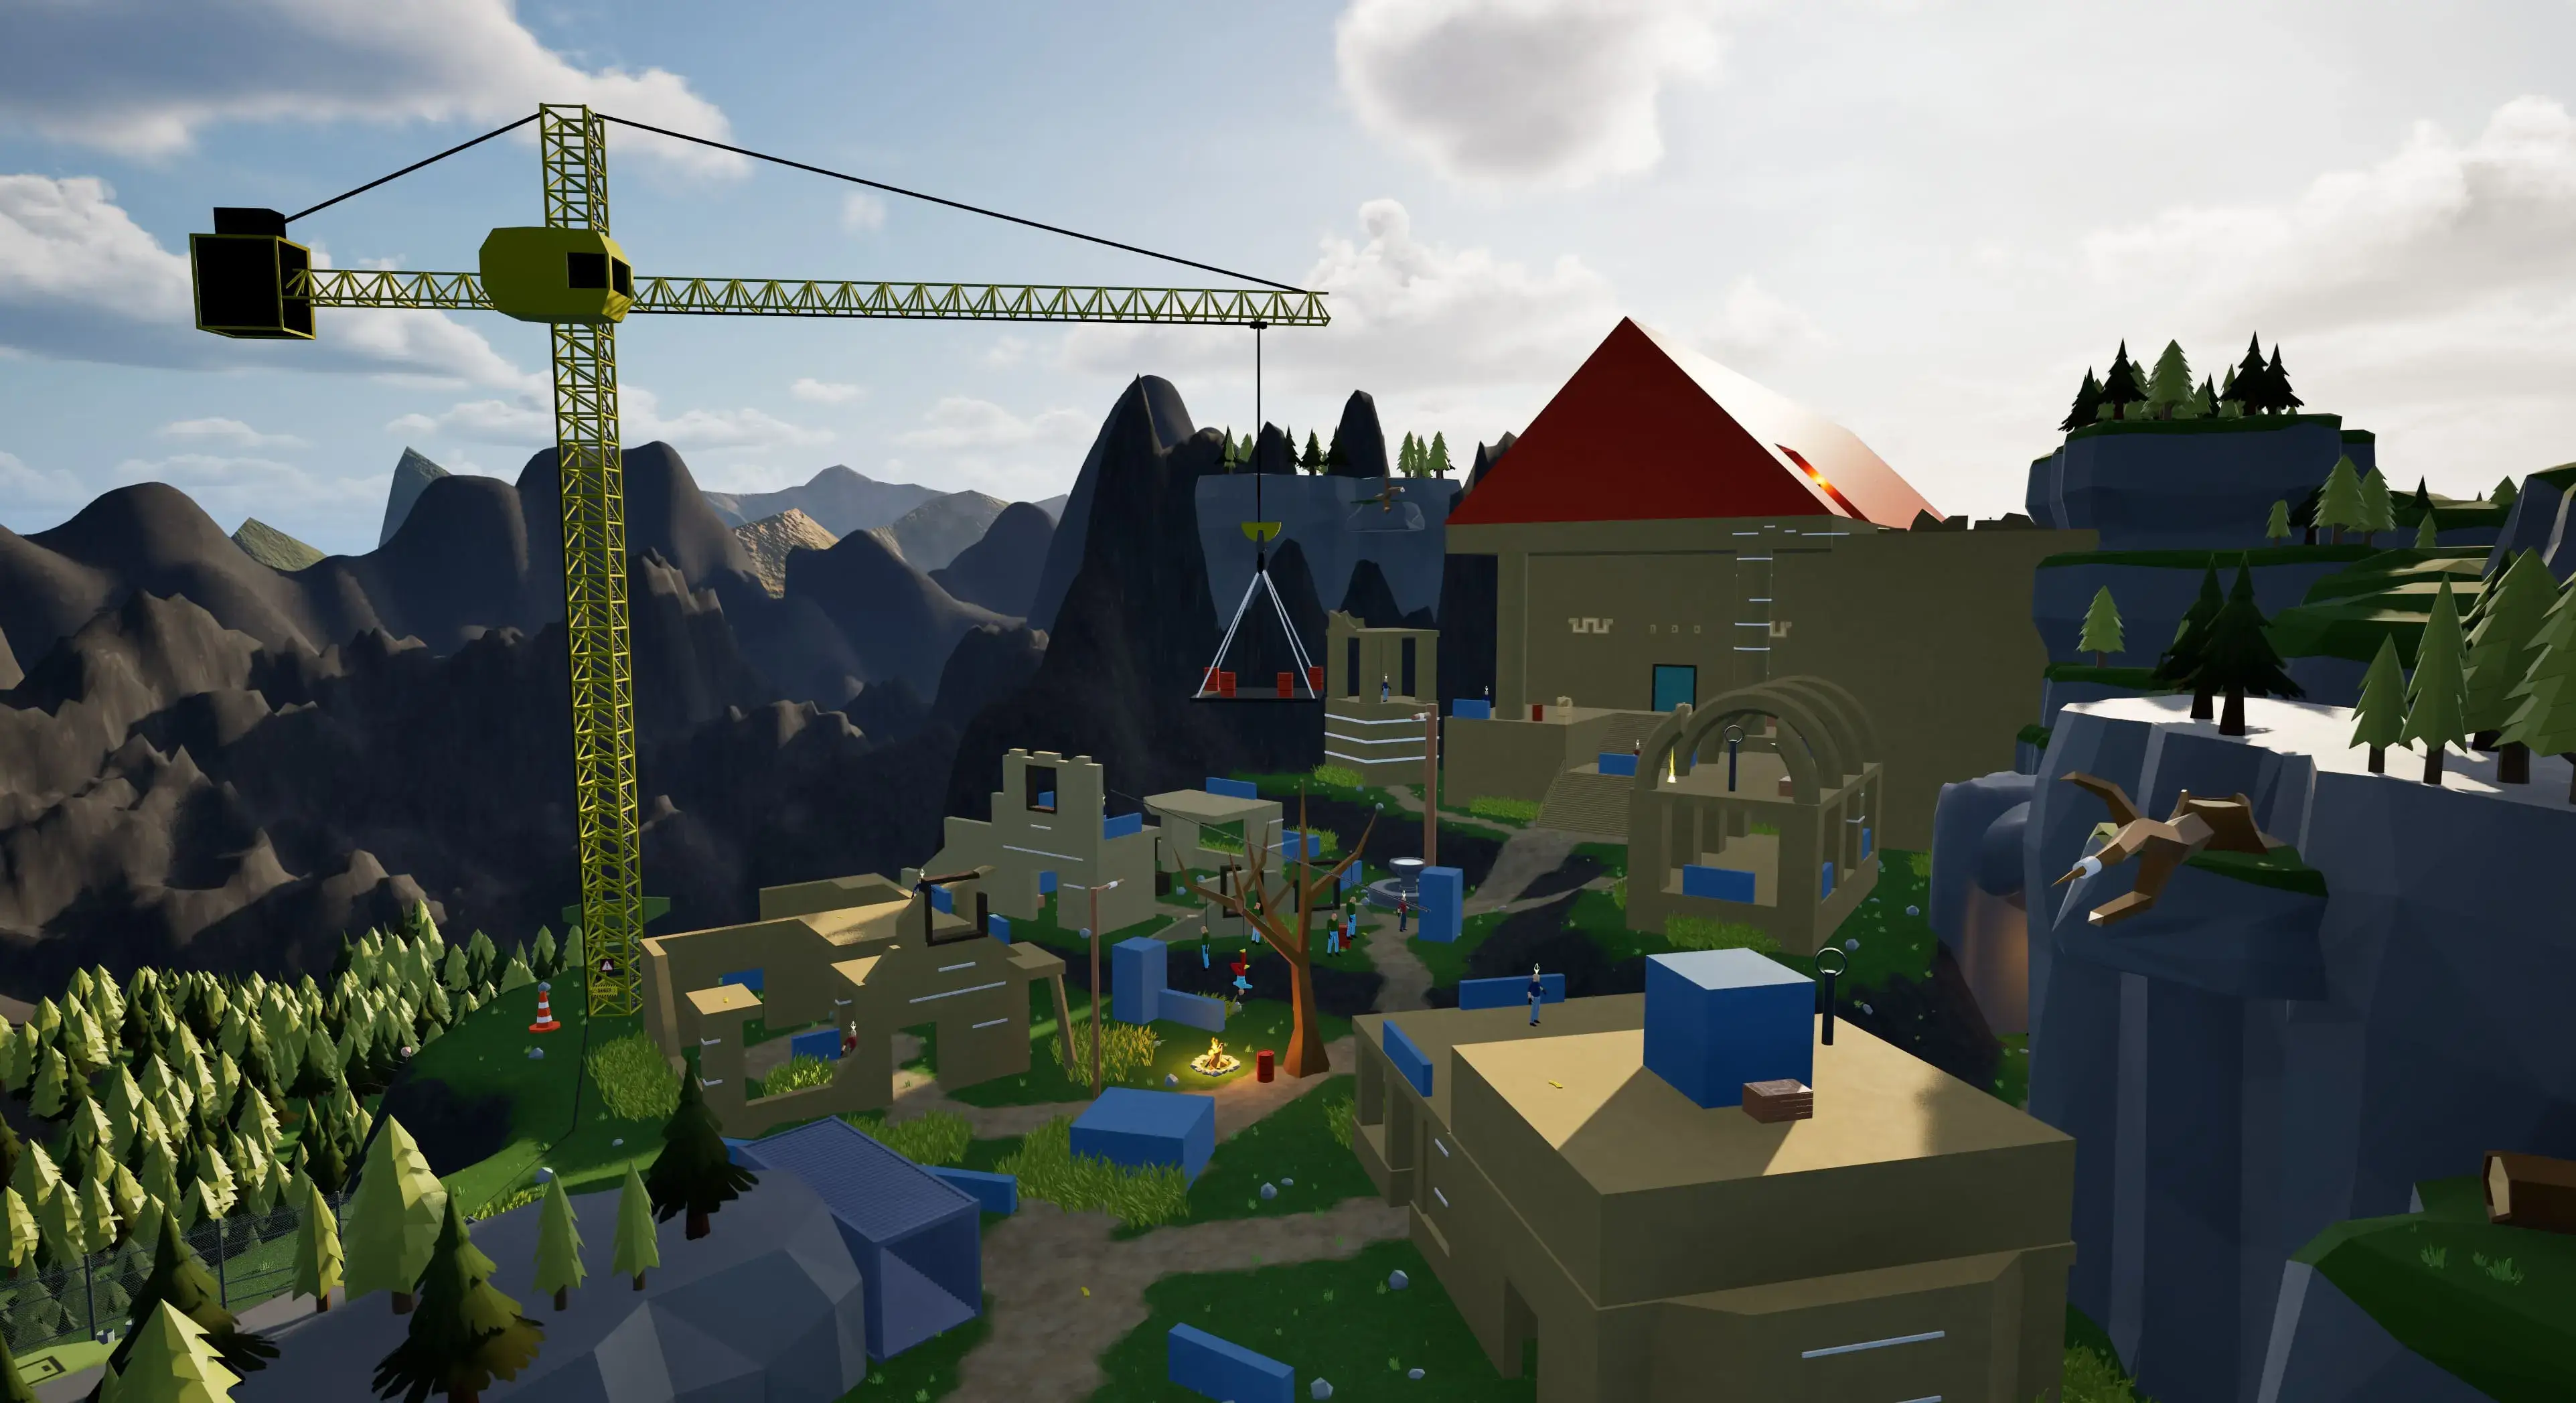
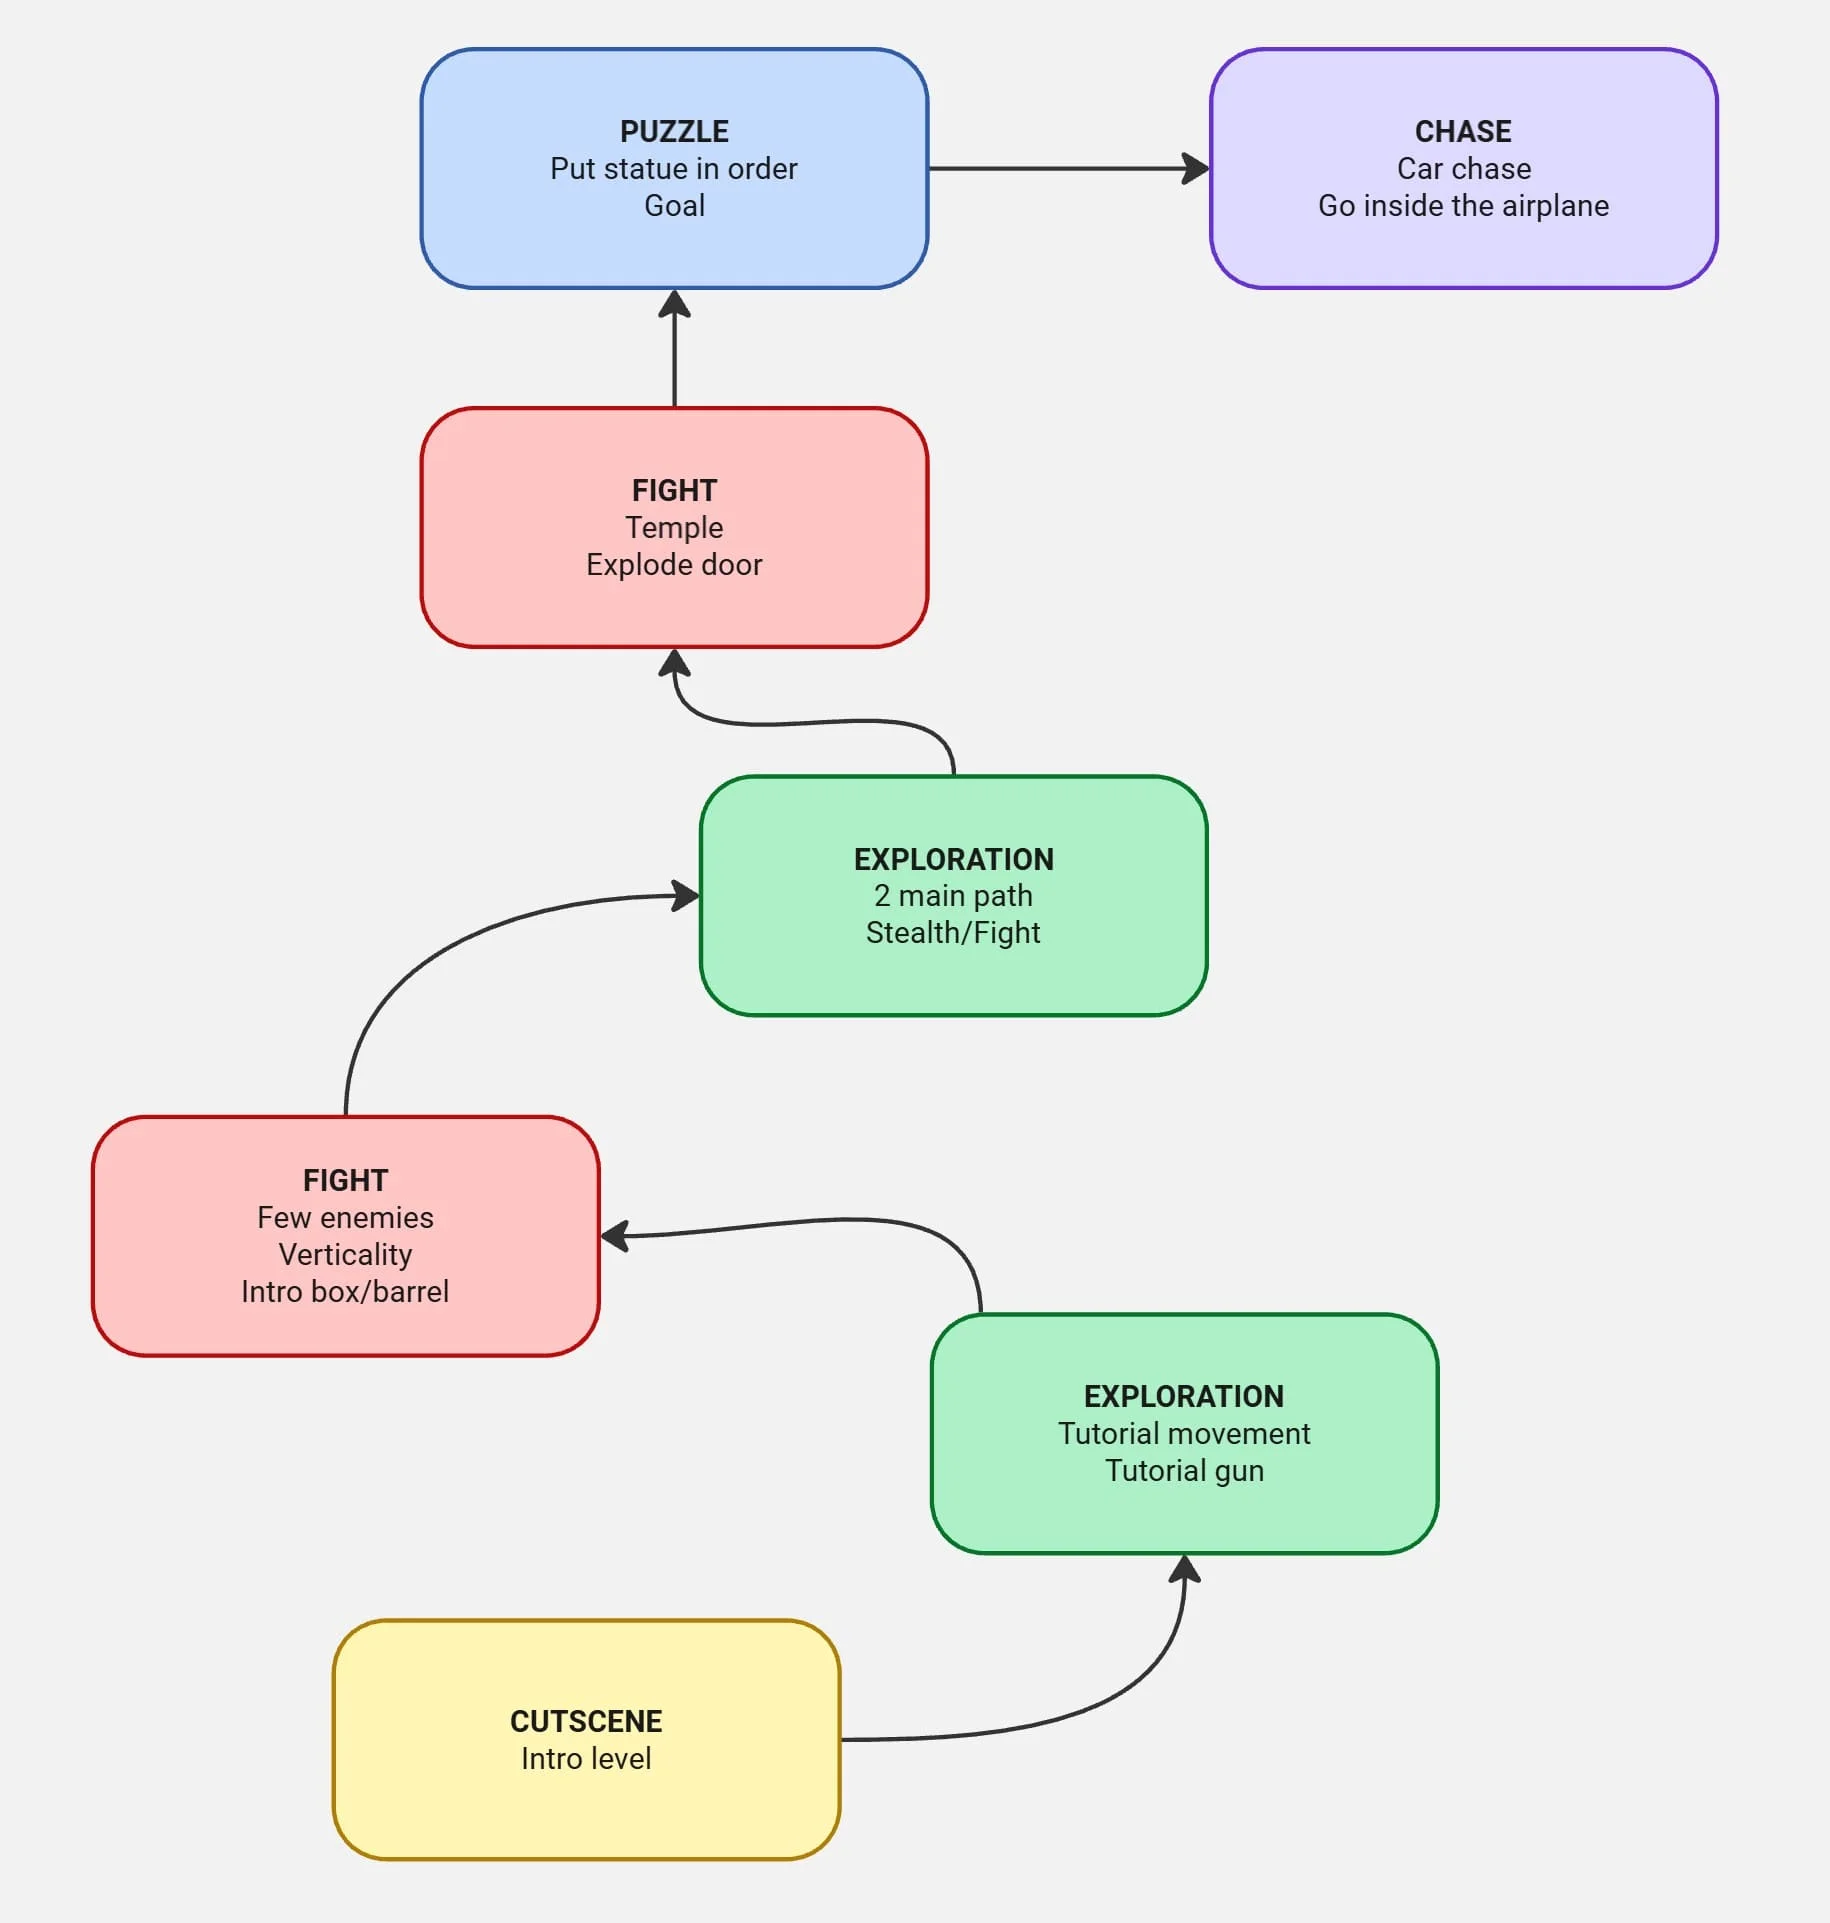
Once the player gains control, they are free to explore the area, discovering containers scattered from the crashed aircraft. Core mechanics such as jumping, climbing, and shooting are introduced through environmental interaction rather than combat, allowing the player to learn them safely before being challenged, while a clear visual framing of the temple and the tower establishes direction and immediately communicates the player’s goal.
Intensity = 3/10
The first combat encounter introduces a small group of enemies, easing the player into combat while emphasizing verticality. Upon entering the area, the player is positioned behind cover, allowing them to observe enemy patrols and plan their approach. They can choose a stealth strategy, using cover and a silenced pistol, or engage openly, taking advantage of explosive barrels placed at the center of the arena.
Intensity = 7/10
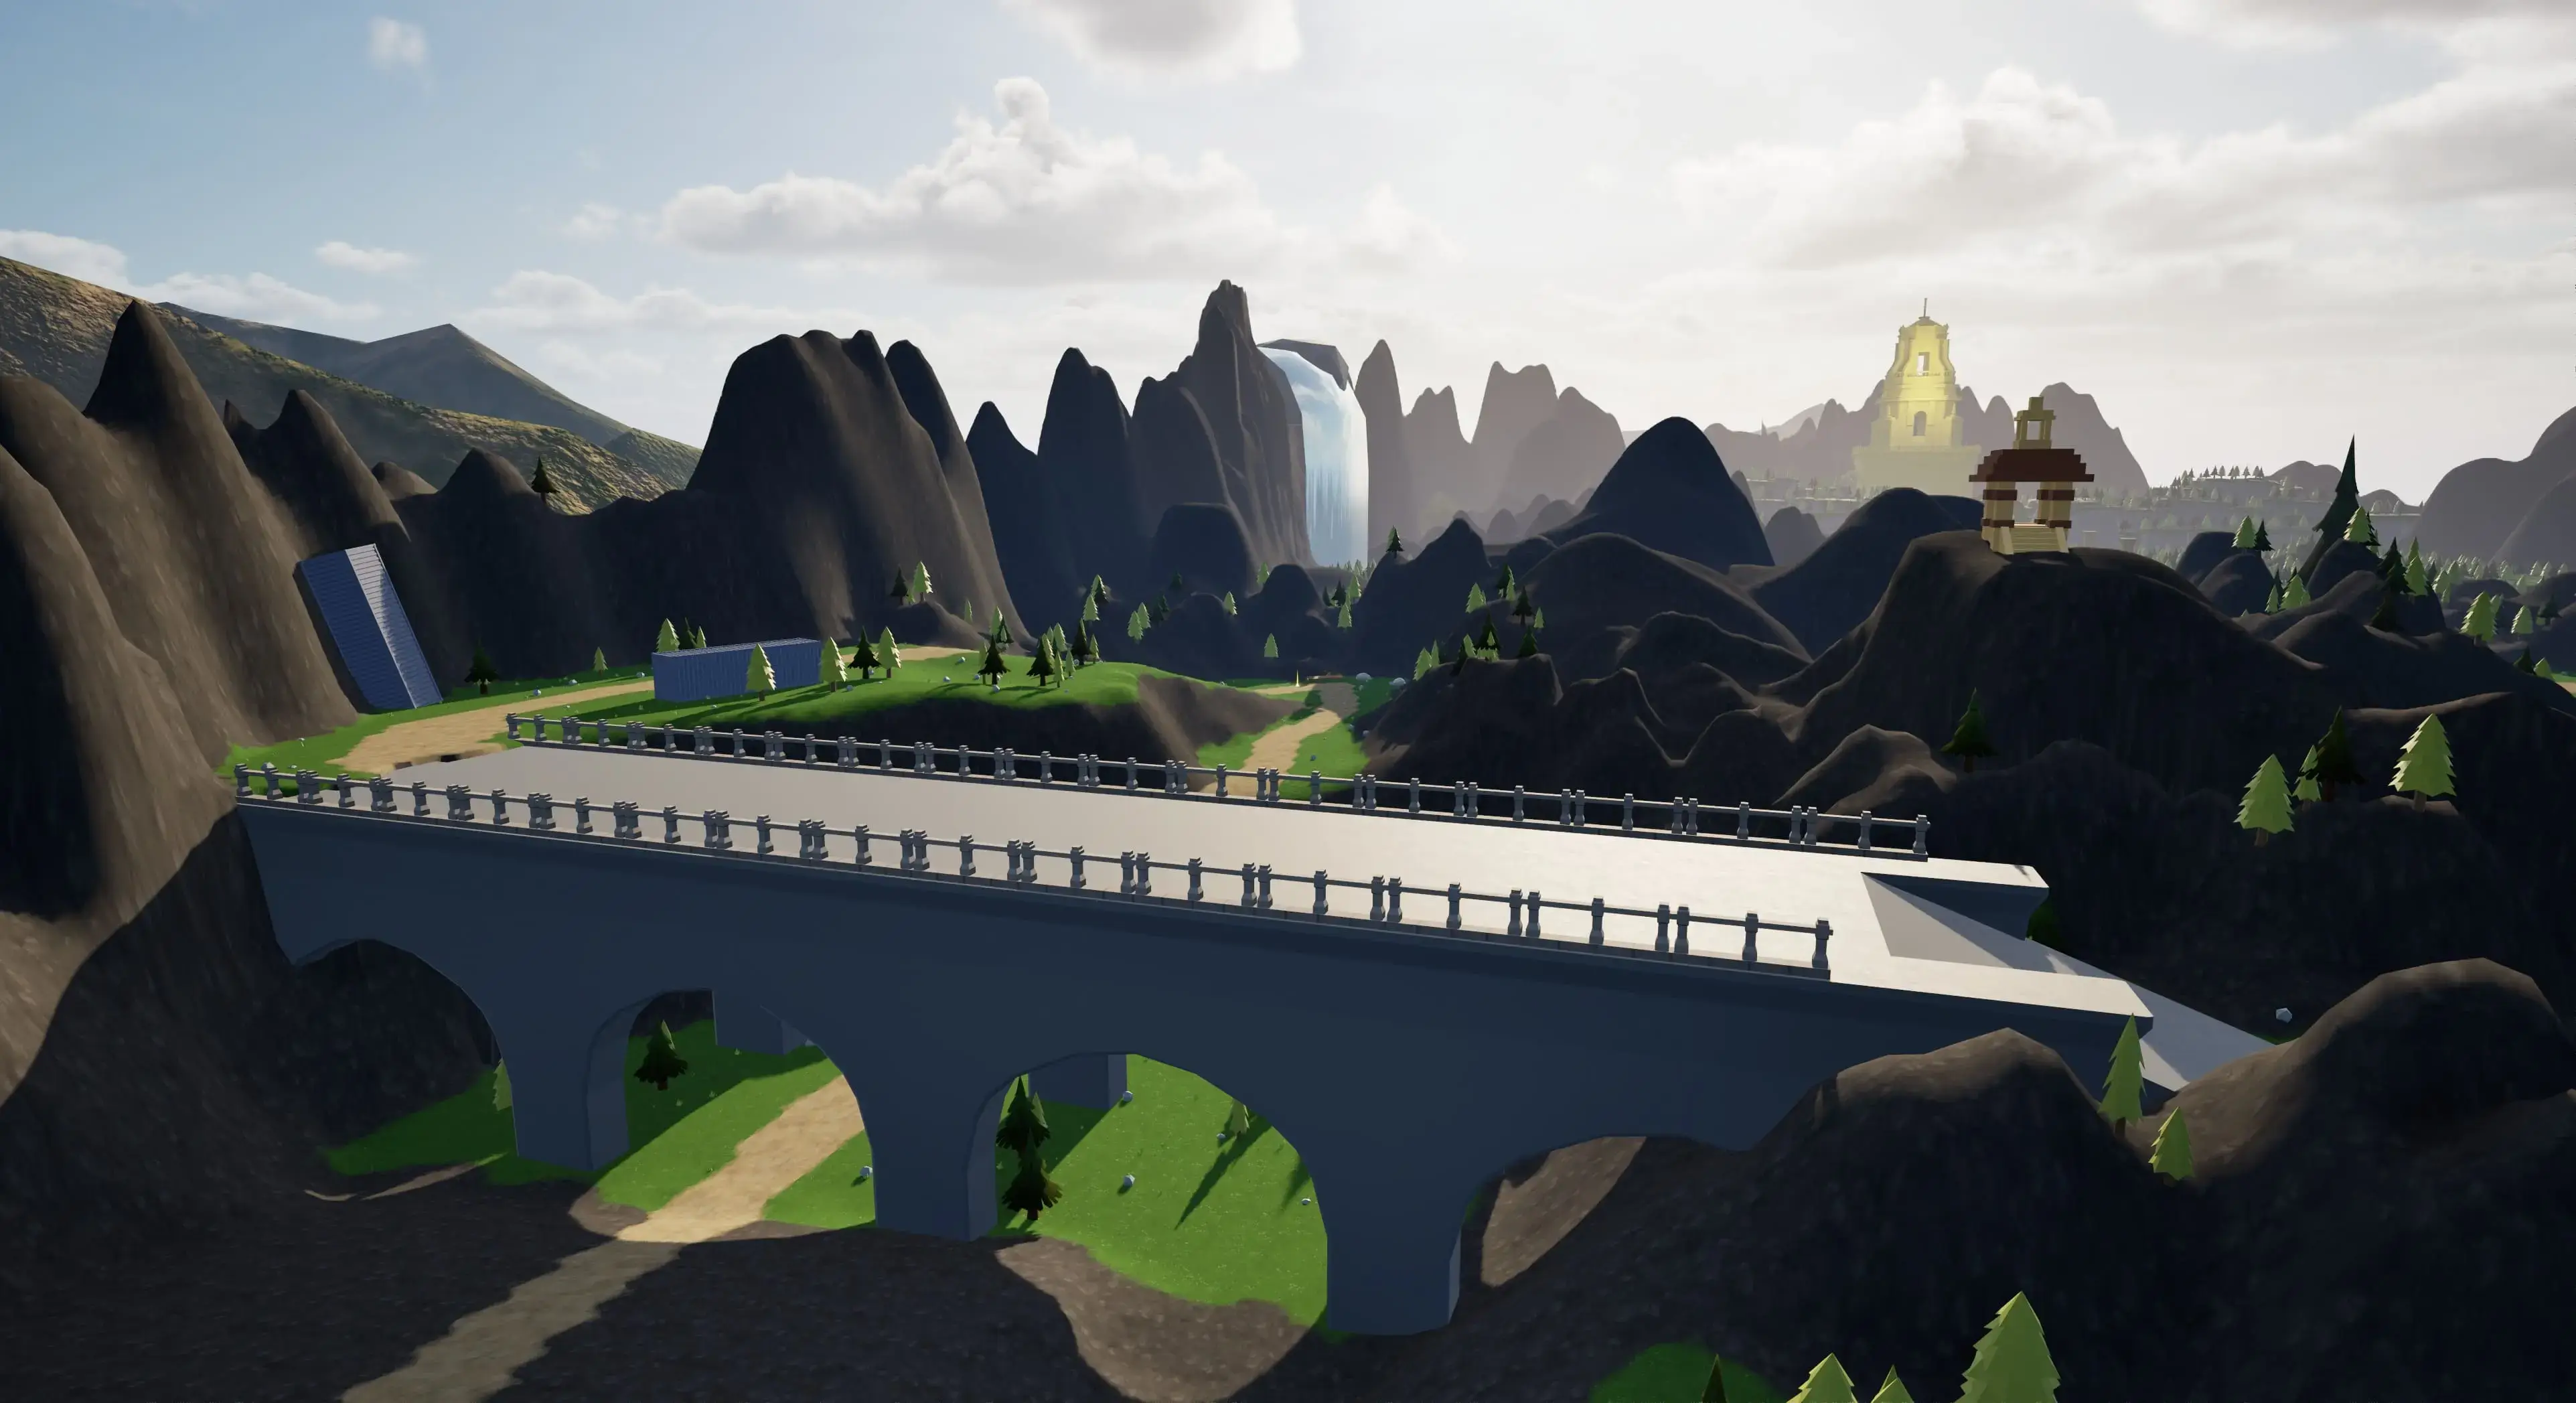
The player is free to explore again, choosing between the main path or optional routes that offer additional rewards. The area reinforces environmental storytelling, with enemy corpses conveying the aftermath of conflict. The rope mechanic is introduced to reach distant locations, leading into a set piece where a bridge collapses mid-crossing due to an explosion, delivering a high-adrenaline, memorable moment.
Intensity = 4/10
The player starts from an elevated vantage point, intentionally designed to let them observe enemy movements and plan their approach. From here, two clear options are presented: a direct route for open combat or a more thoughtful stealth path through a container. The arena is built with multiple vertical layers, supported by climbable elements and a central rope, all carefully placed to encourage fast, dynamic movement and give the player full control over how they navigate and engage in the encounter.
Intensity = 8/10
The player can explore using a movable cart, which serves both as cover during combat and as a tool to climb to a higher ledge and exit the arena. The temple comes back into view, reinforcing progression toward the objective, while enemies can be seen gathering at its entrance, also attempting to access it. From here, the player can choose between two paths: take the main route toward a direct confrontation at the temple, or venture into a hidden cave, subtly revealed by a torch, which rewards exploration with resources and provides a higher vantage point over the enemies.
Intensity = 5/10
This encounter follows the same core setup, giving the player a safe vantage point to study enemies and plan ahead, but on a much larger scale. The arena features more enemies and is designed to fully test all the mechanics introduced so far. Strategy is rewarded, as the player can explore, interact with the environment, climb, and approach the fight in different ways. The space is built around multiple destroyed structures in front of the temple, spread across three interconnected vertical layers, allowing for fluid movement and maximum freedom in how the encounter is tackled.
Intensity = 9/10
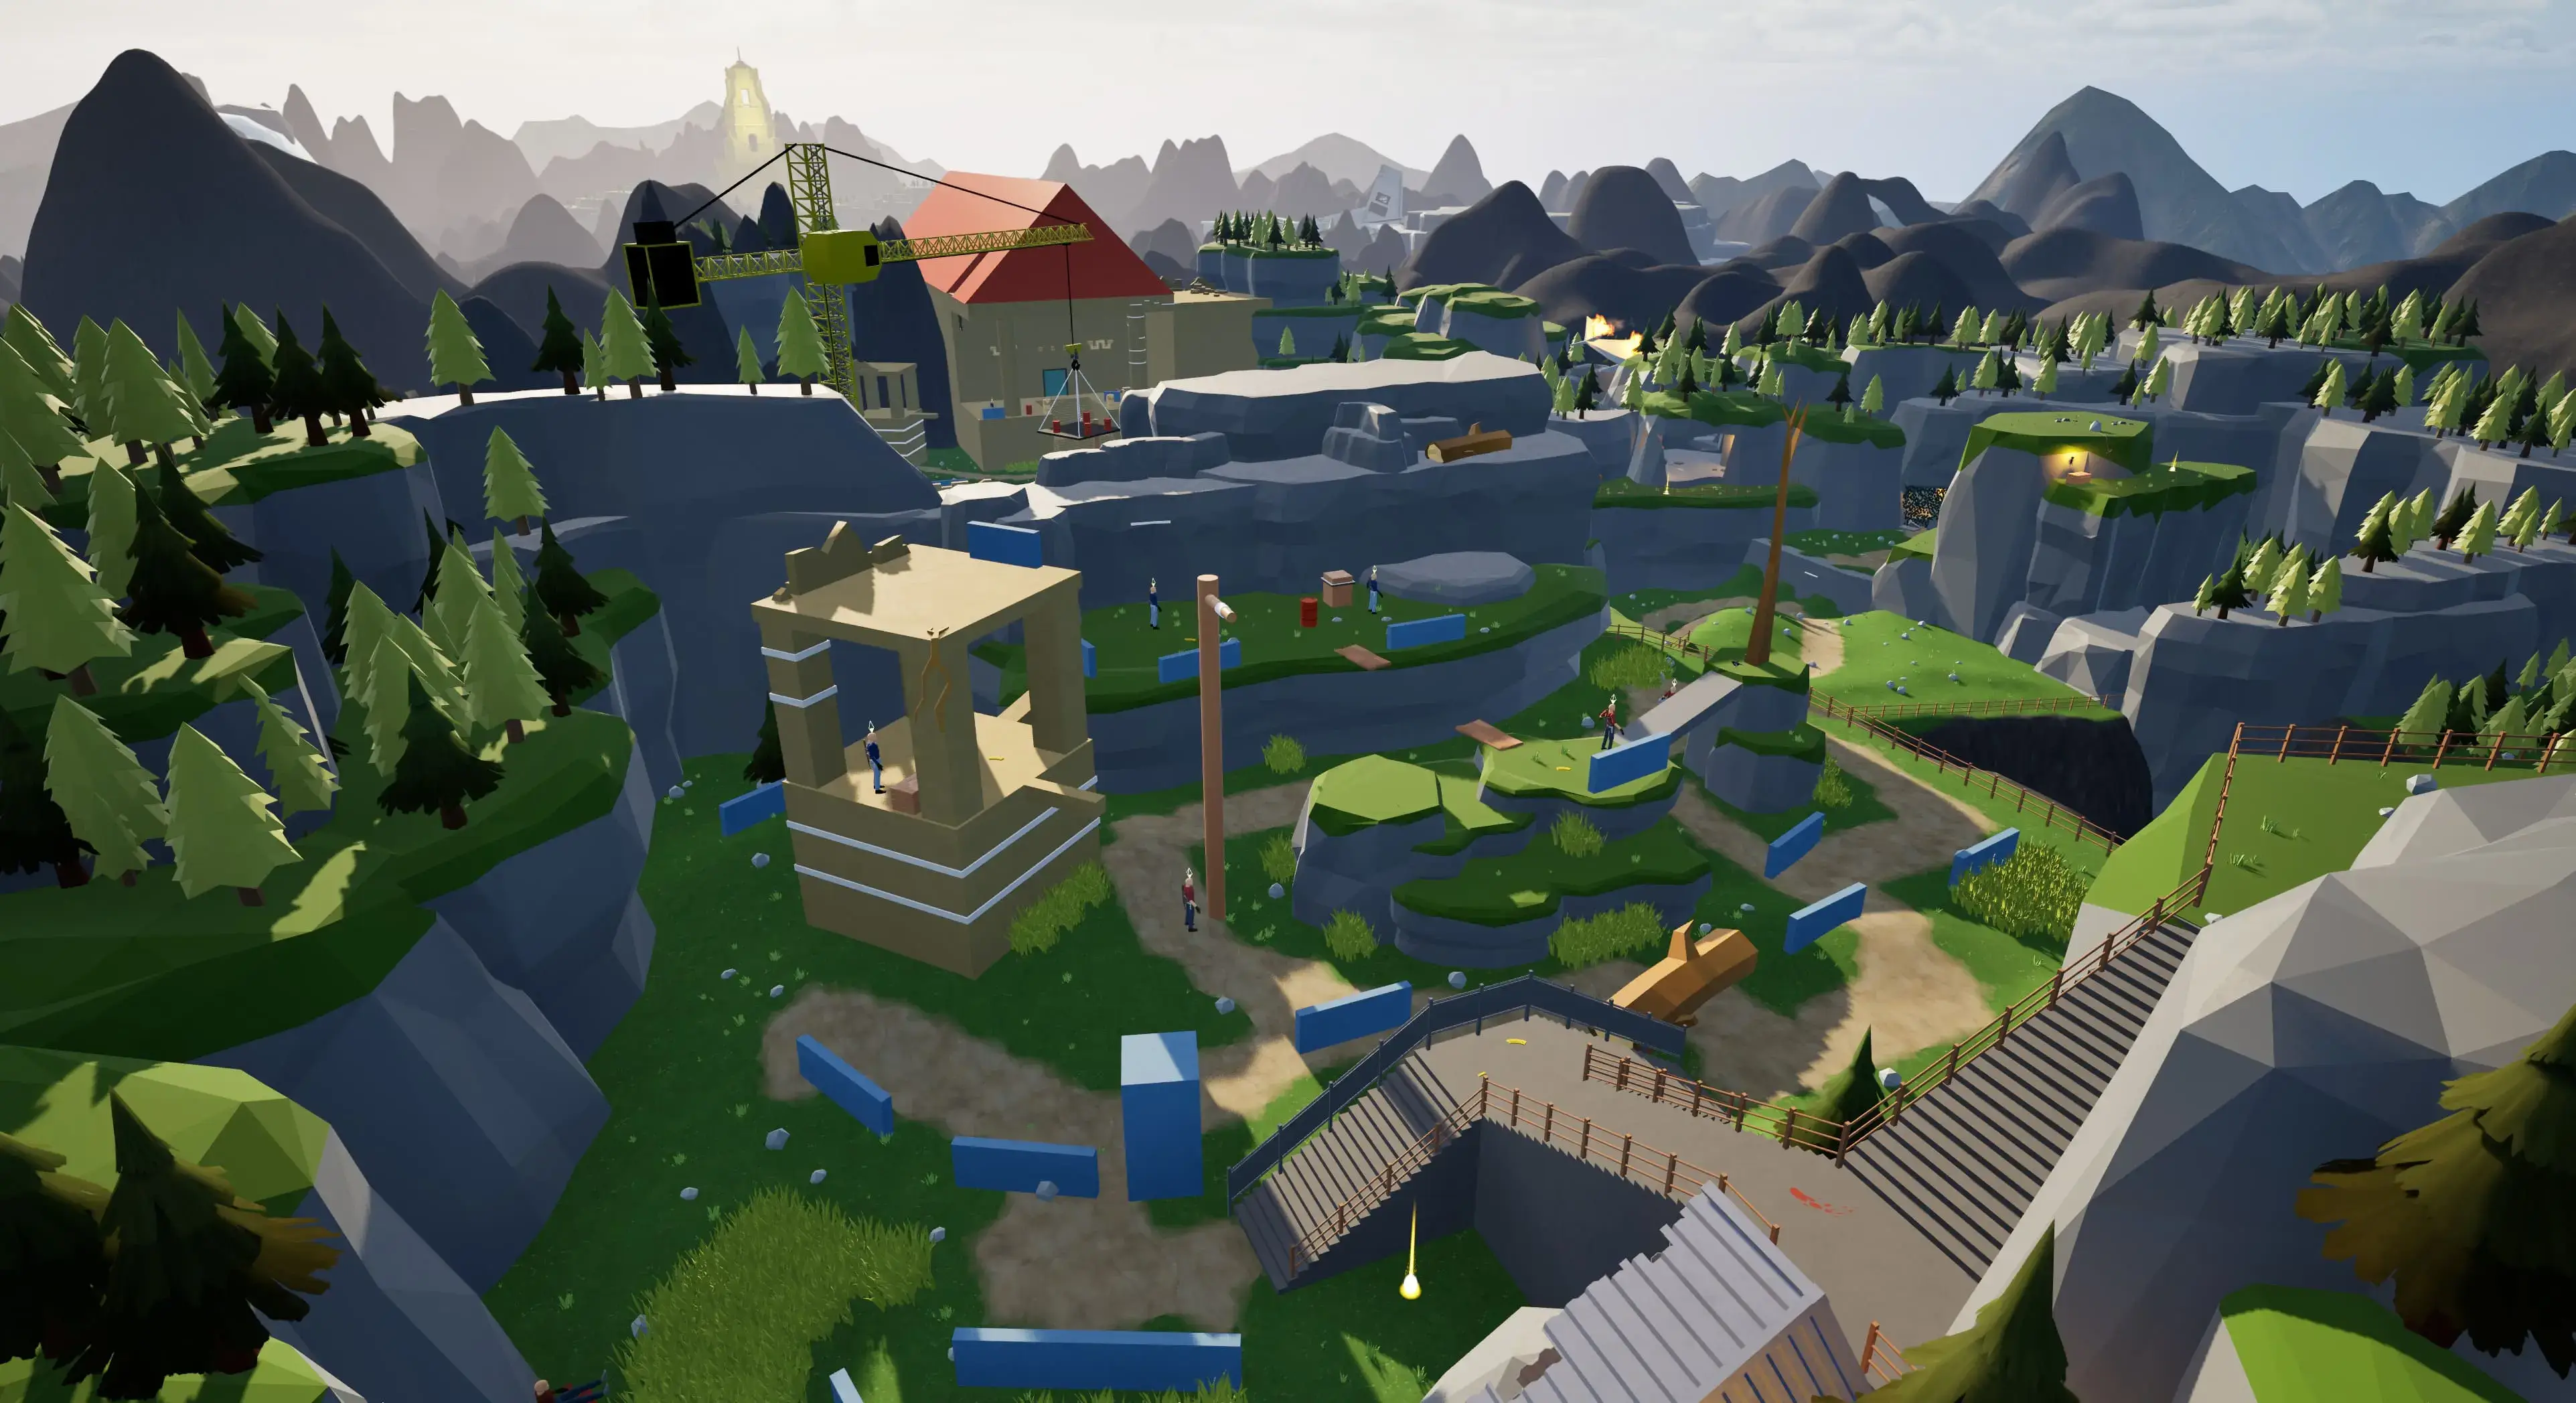
After the fight in front of the temple, the player needs to find a way inside. Through the use of affordances, lighting and framing, an opening on the roof is made clearly visible, guiding the player toward the solution without explicit direction. The player can then climb the tall temple column to reach it and activate the mechanism that opens the main entrance, reinforcing the use of previously introduced mechanics and turning this moment into a short traversal challenge that reinforces verticality.
Intensity = 4/10
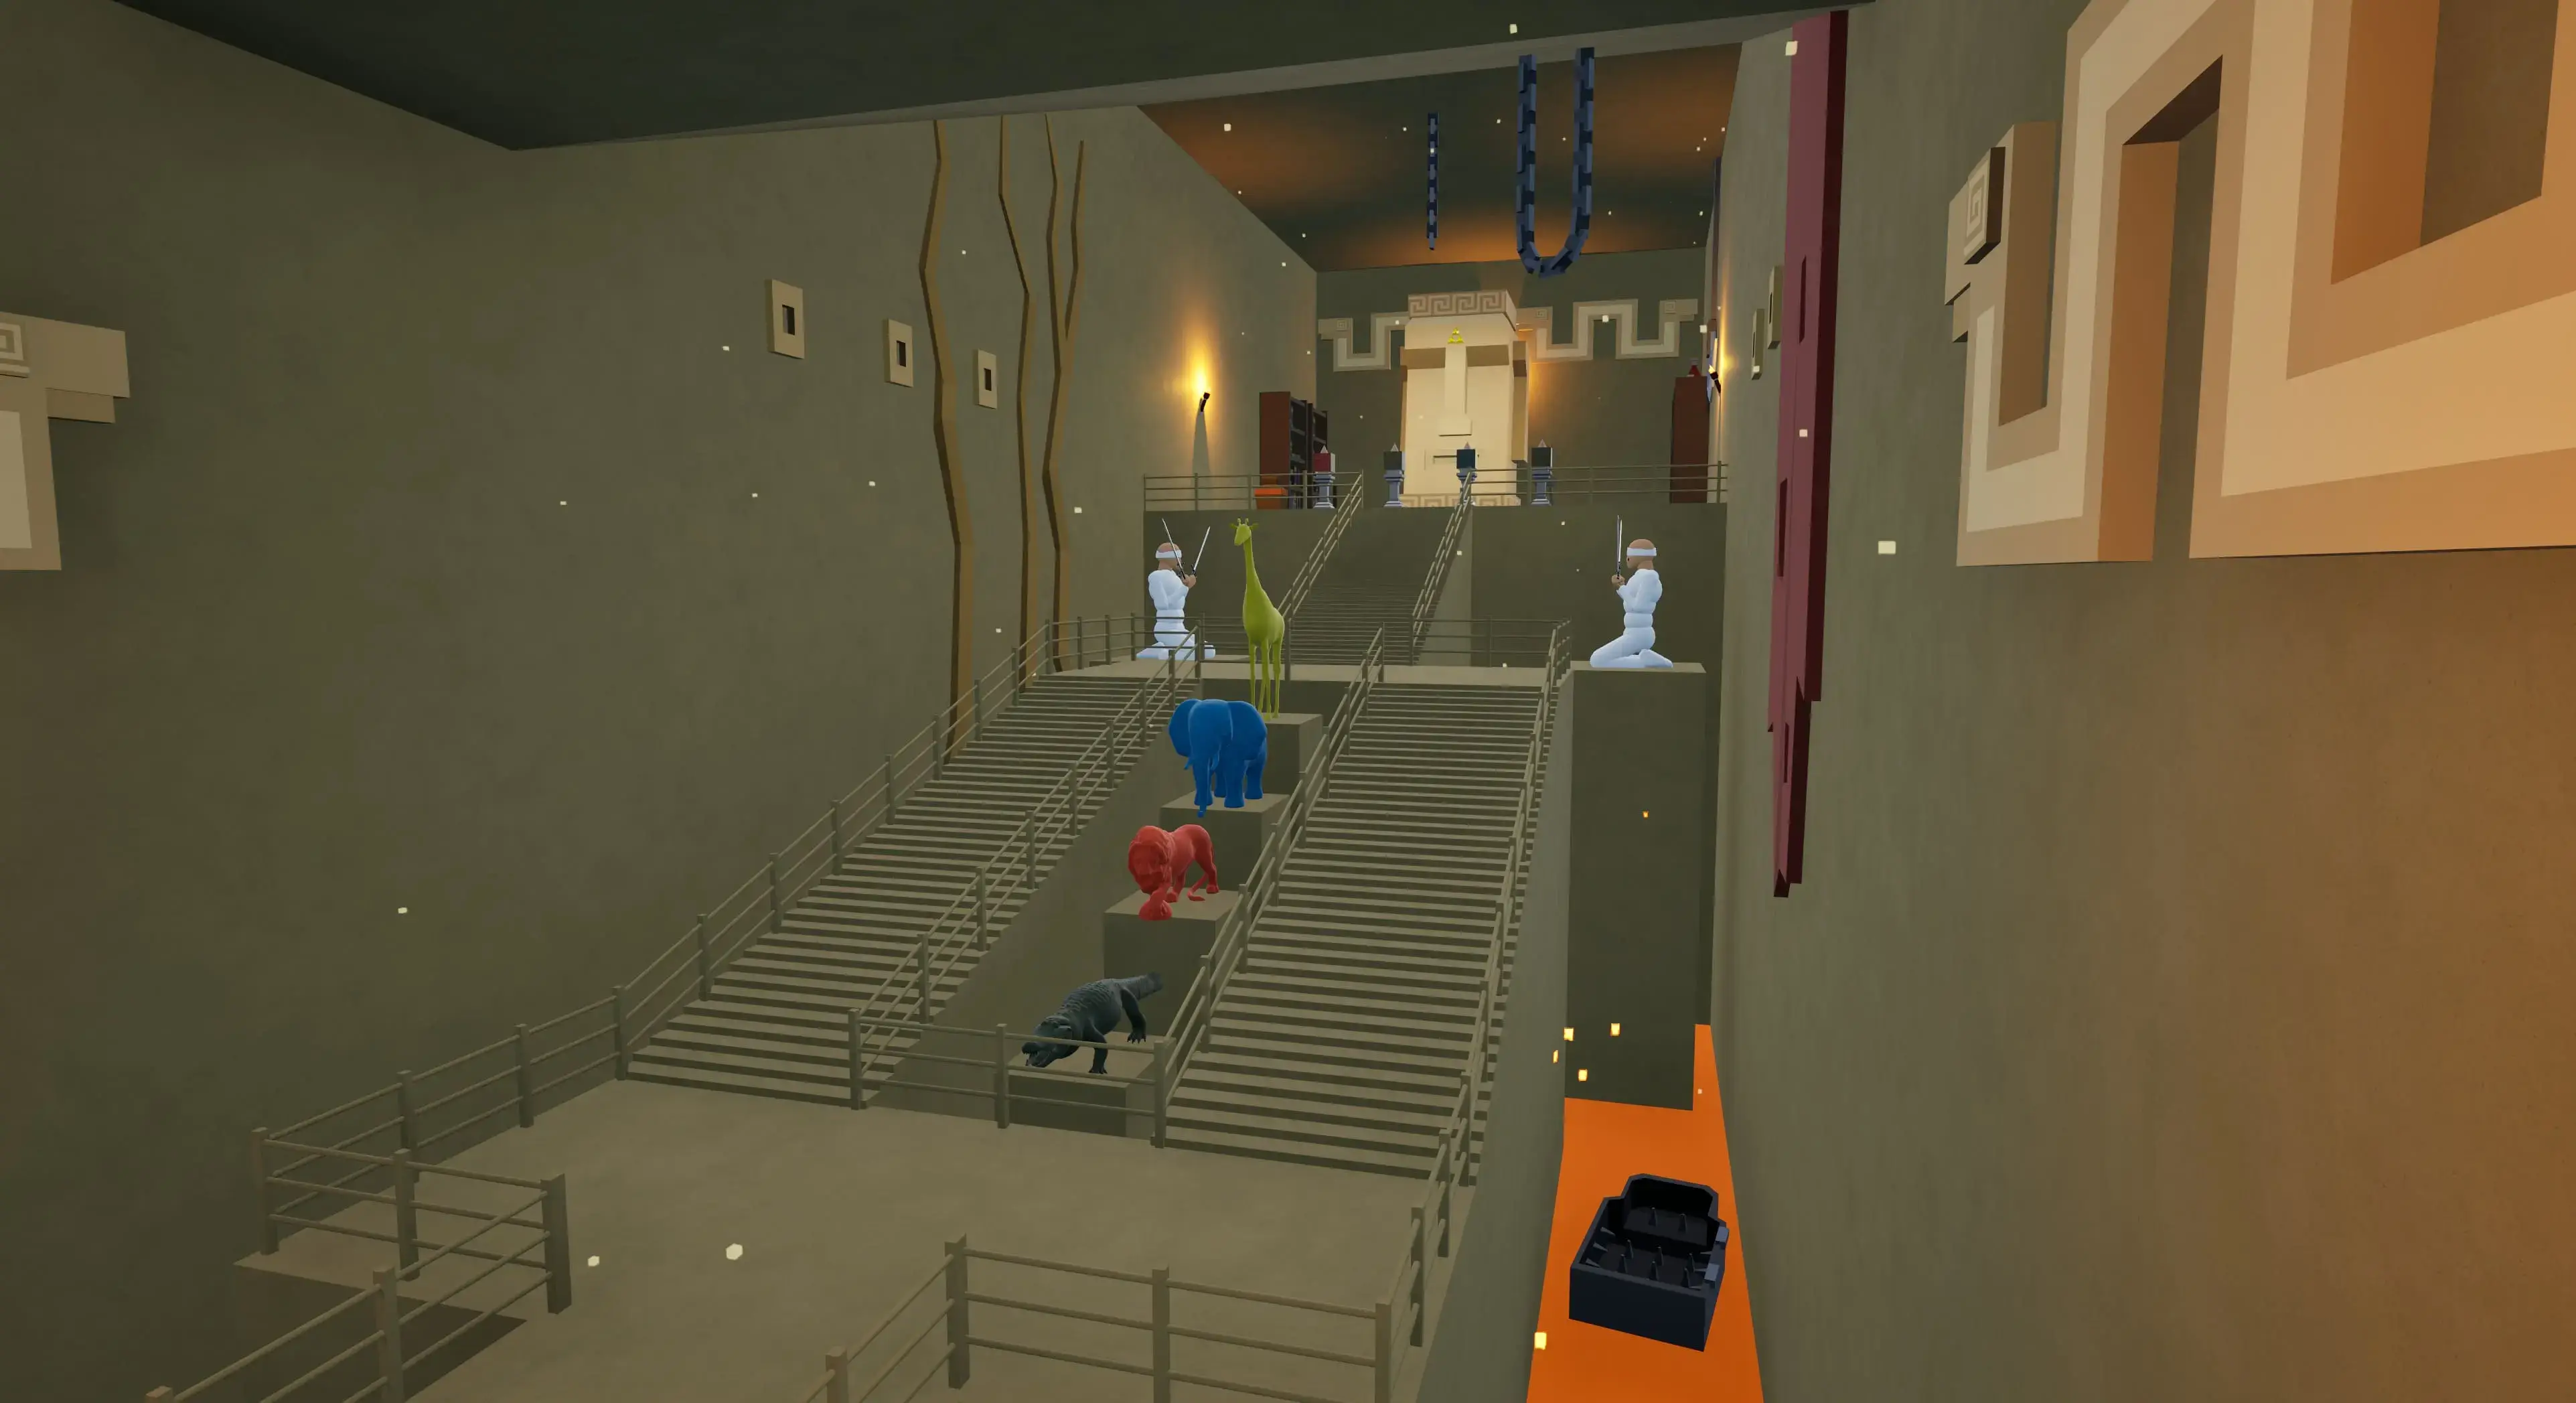
For the puzzle, the goal was not to create a difficult challenge but to focus on observation. The player rotates monoliths to match the order of the animal statues in the temple, rewarding attention to the environment. To support this, I used strong colors and lighting to highlight the statues and draw attention. The first one requires only a single rotation, showing the correct logic early on, and an audio cue confirms when the solution is correct, providing clear feedback to the player.
Intensity = 6/10
After retrieving the treasure, a trap is triggered and the player falls into a cave, using a bait and switch to subvert expectations without causing frustration. Inside, a torchlight guides the player toward the exit, maintaining clear direction. Once outside, the player gains access to a vehicle to reach the tower where the brother is waiting, concluding the mission. This first driving section helps the player get familiar with movement, acceleration, and steering.
Intensity = 5/10
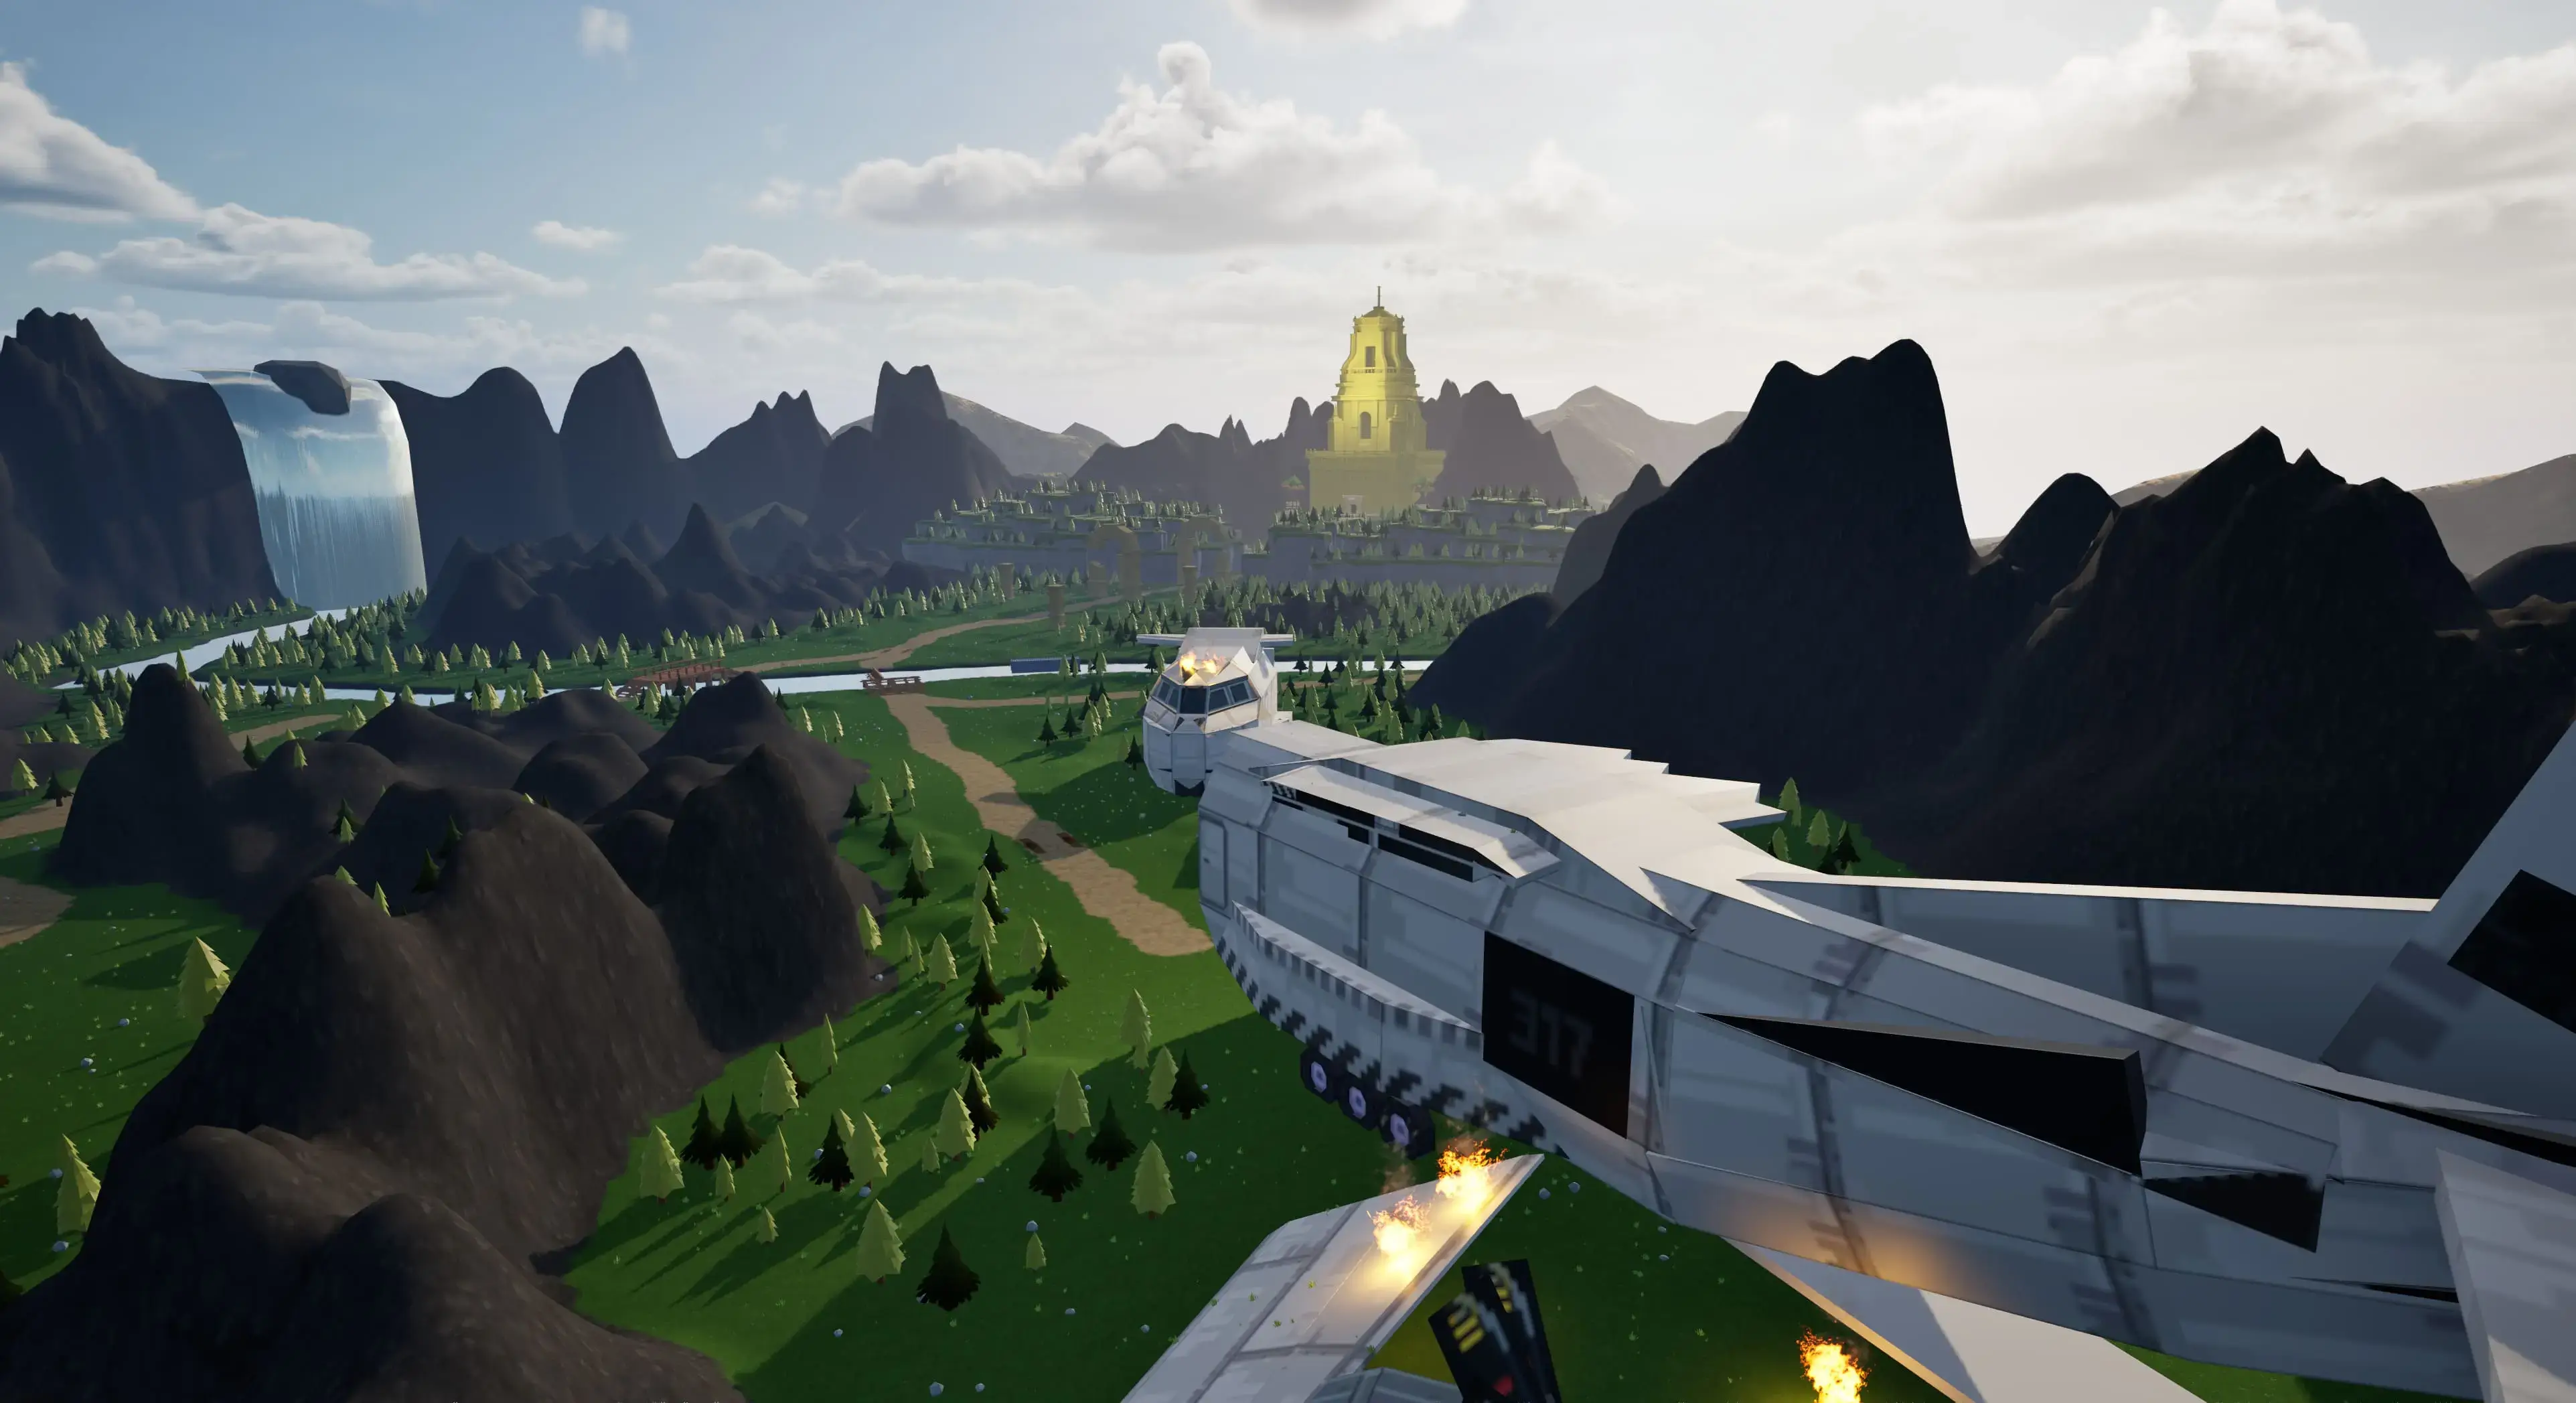
After learning the vehicle controls, the player is challenged by two enemy cars that chase and shoot. This is the peak tension of the level, with explosions, falling trees, and a tight cave section that increases pressure. Exiting the cave reveals the crashed plane and the nearby tower, showing the player is close to the goal. The sequence ends with the player driving through the wreckage and jumping a collapsed bridge, while enemies crash behind them, reinforcing the high-adrenaline climax.
Intensity = 10/10
The final beat lowers the intensity, giving the player time to breathe and smoothly come down from the climax. The player reunites with their brother, and together they enter the final tower, collaborating and helping each other through environmental interactions. This is guided through subtle environmental cues, keeping the experience natural without feeling forced or overly directed.
Intensity = 4/10
I started the production by defining my design goals, focusing on exploring verticality and crafting a level rich in gameplay, where the player could explore, fight, solve puzzles, and drive, all while experiencing a narrative that matched my vision.
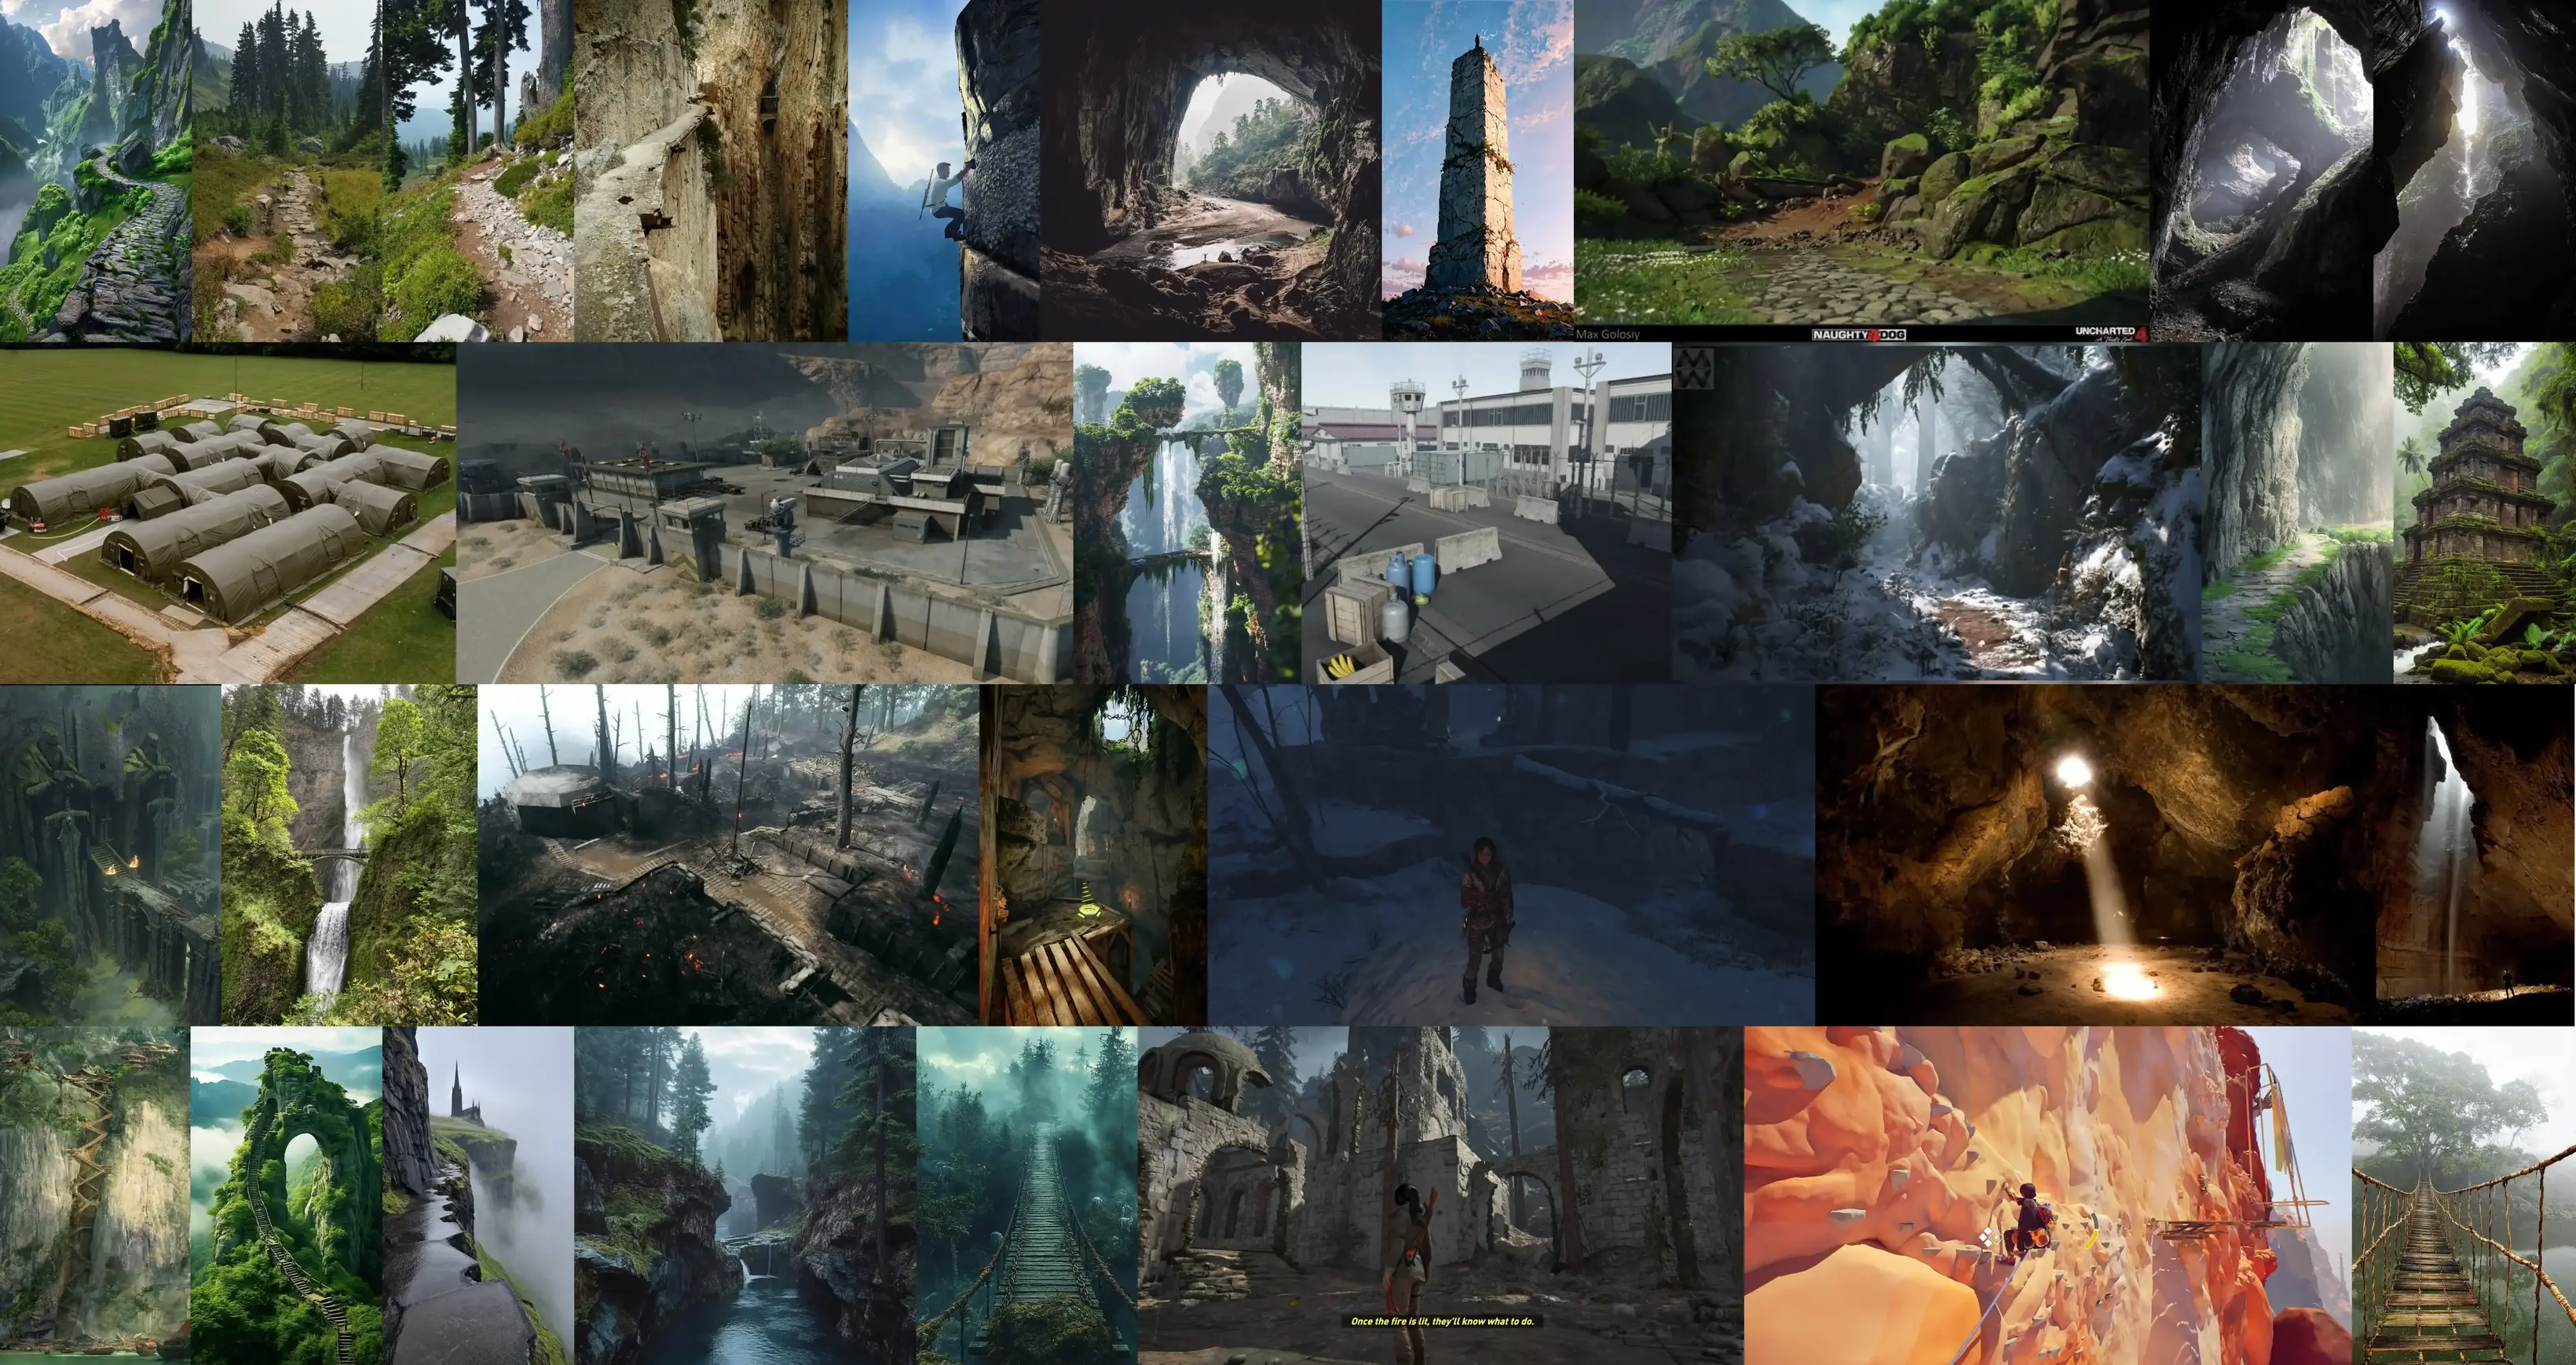
Once the foundation was clear, I built a moodboard to gather references, collecting both visual inspiration and ideas for spatial design. For the visual side, I drew inspiration from Aztec architecture and the mountainous landscapes of Peru and Tibet. For gameplay and level flow, I took cues from Rise of the Tomb Raider and Uncharted 4.
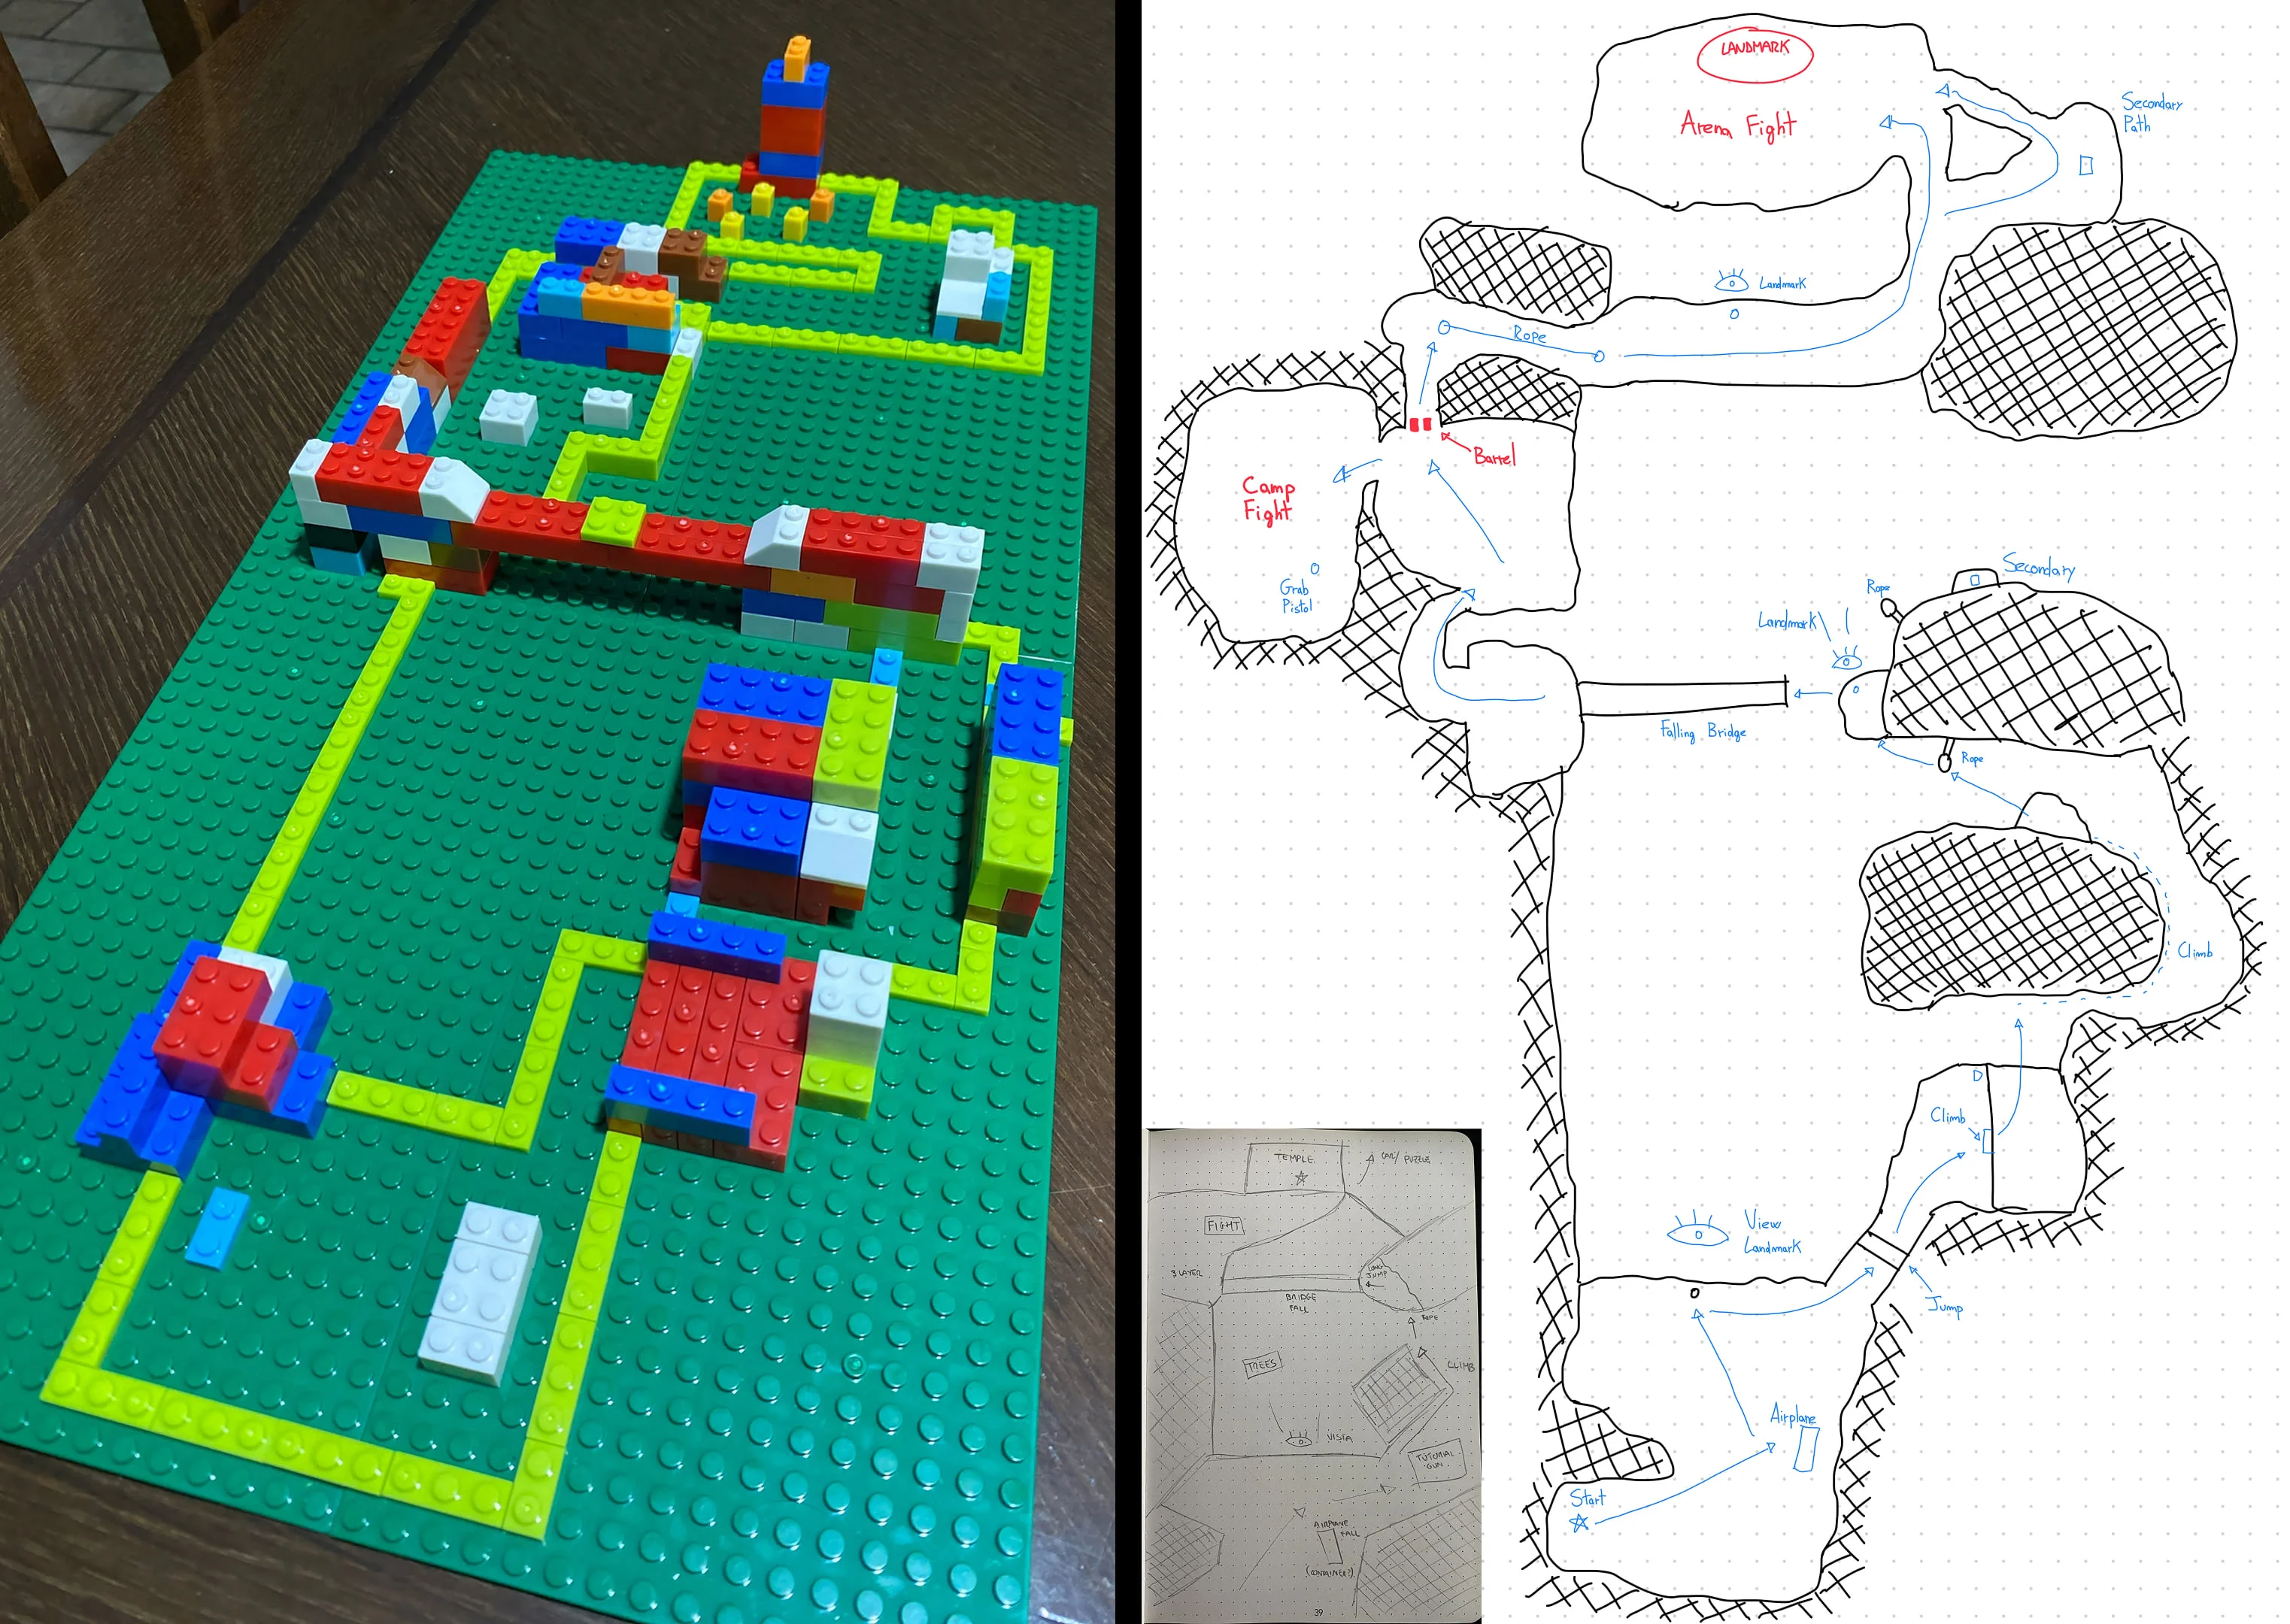
Once I had gathered enough ideas, I moved on to the paper design phase, first sketching by hand and then digitally creating a macro view of the level, aiming to capture the core idea I had in mind. During this phase, I also used LEGO to start visualizing the spaces in 3D, which proved to be an effective approach for understanding layout and proportions early on. This was especially useful in later stages, as having a clear overview of the level helped me plan pacing, player flow, and spatial relationships with clarity.
Next, I defined which mechanics to include in the level, focusing on those that supported the intended experience. I documented them in an Excel table, describing each one, outlining its progression, and mapping how it could interact and combine with others throughout the level. With the mechanics established, I moved to Miro and used bubble diagrams to visualize them, exploring gameplay scenarios in advance and understanding how to distribute and layer mechanics within the space before entering production.
From this groundwork, the overall structure of the level started to emerge clearly, naturally leading to the definition of key beats that shaped pacing and progression. These beats became the backbone of the experience, and I translated them into a pacing graph, making this a crucial step in building a controlled and intentional player experience.
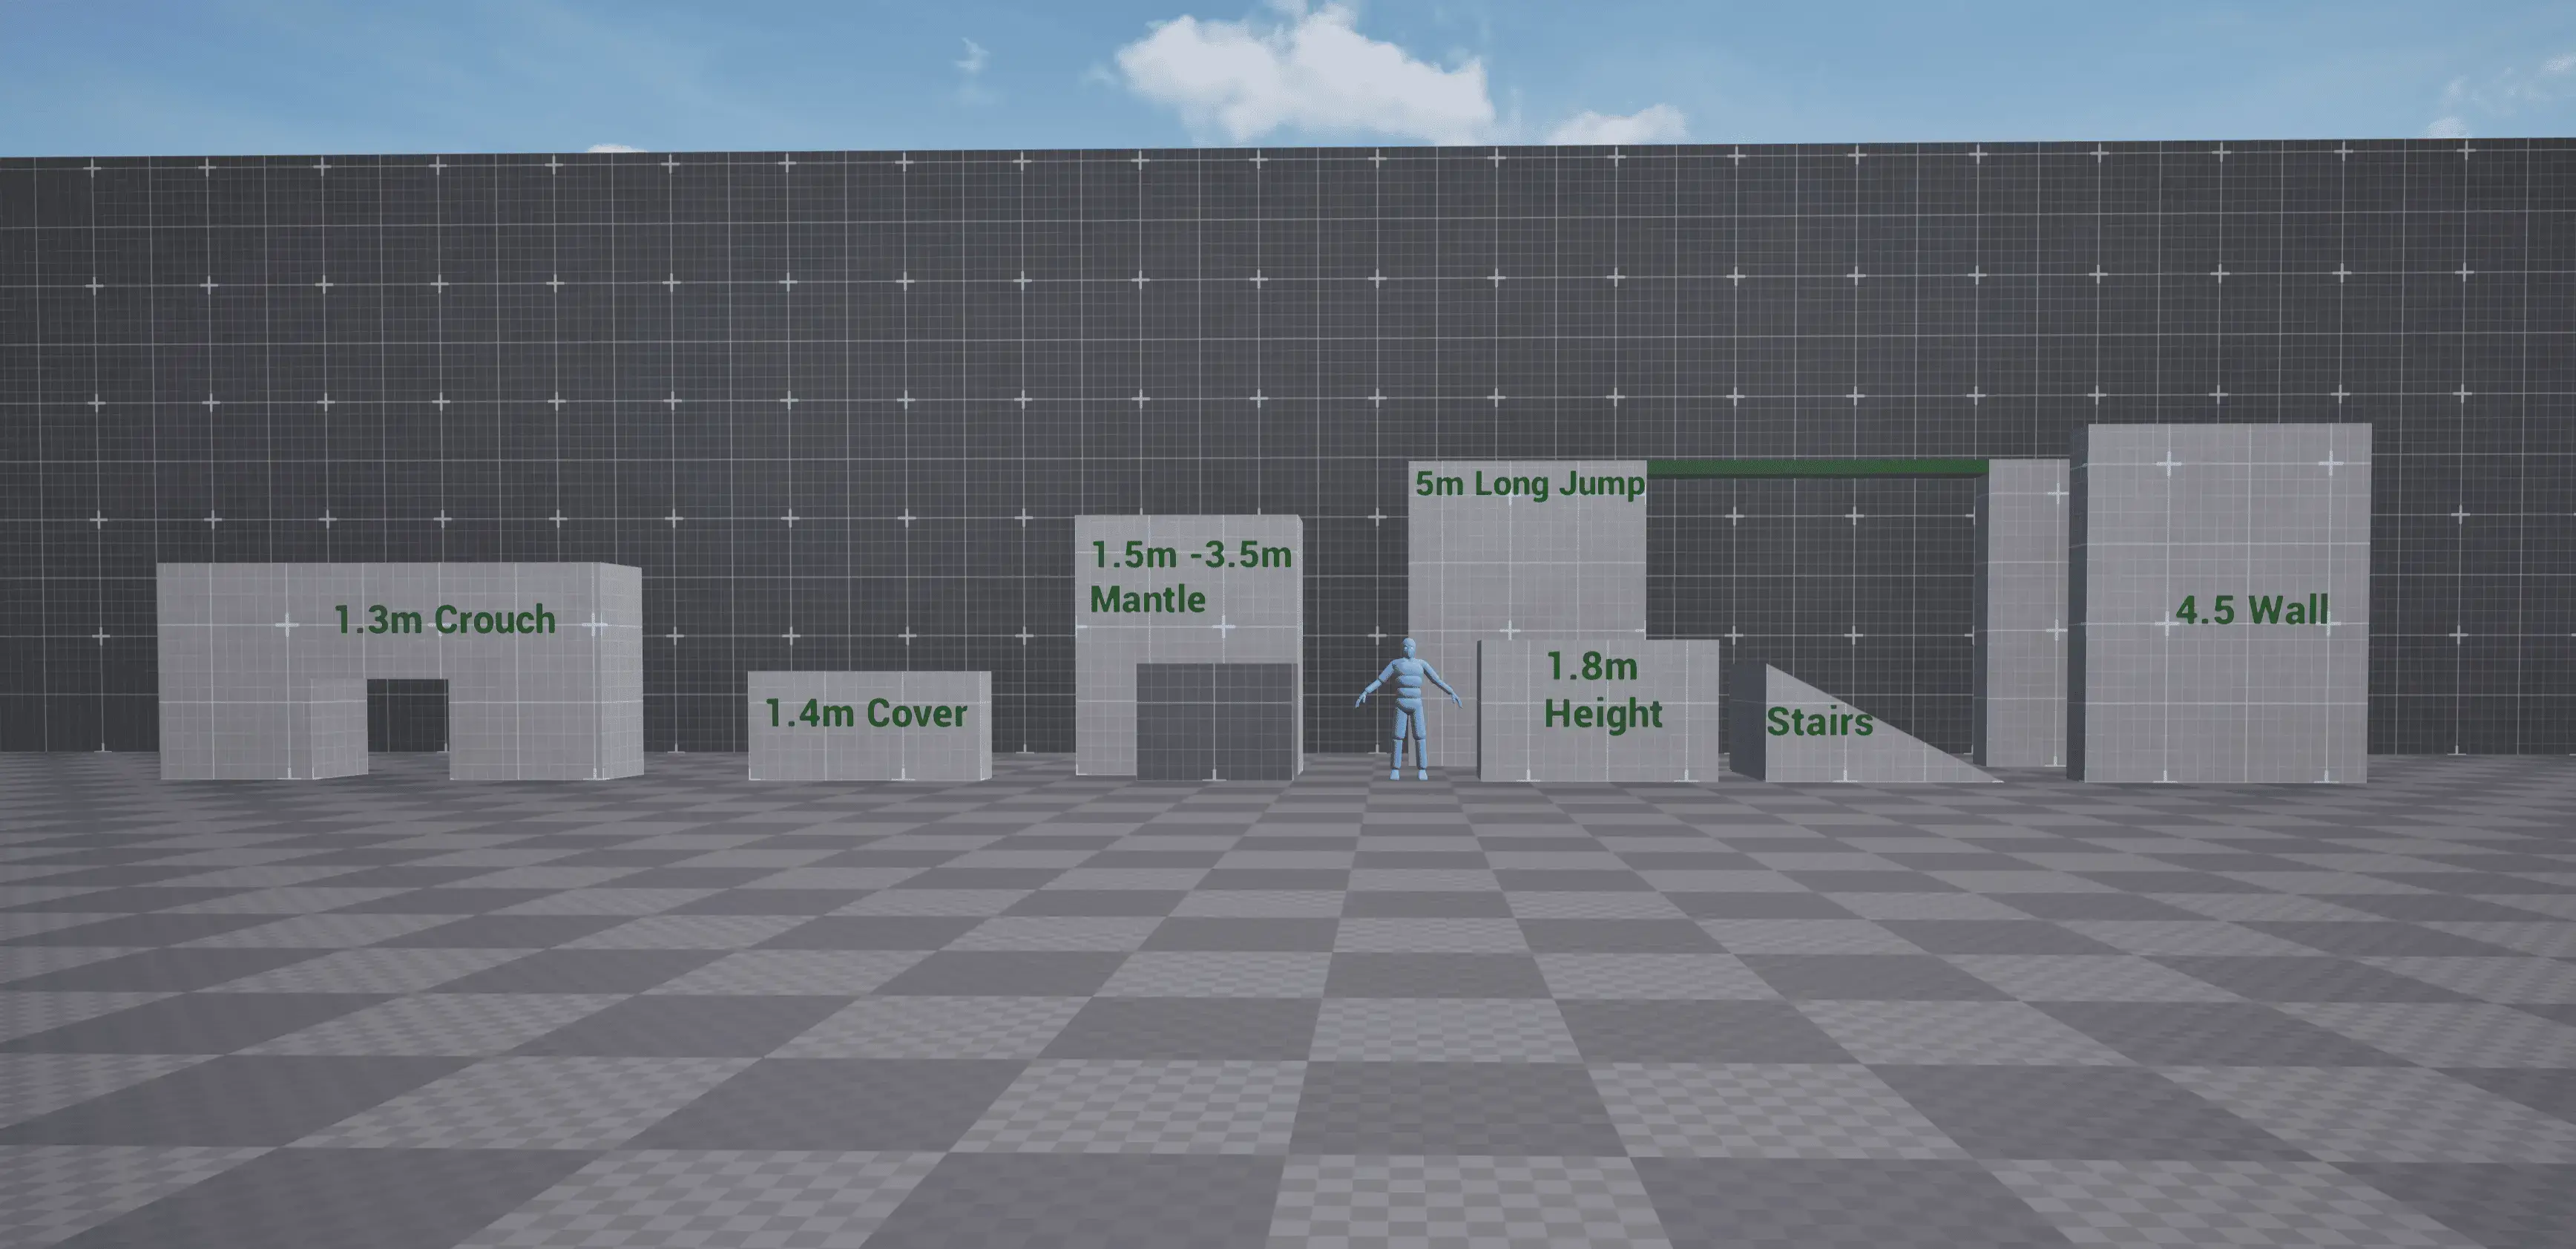
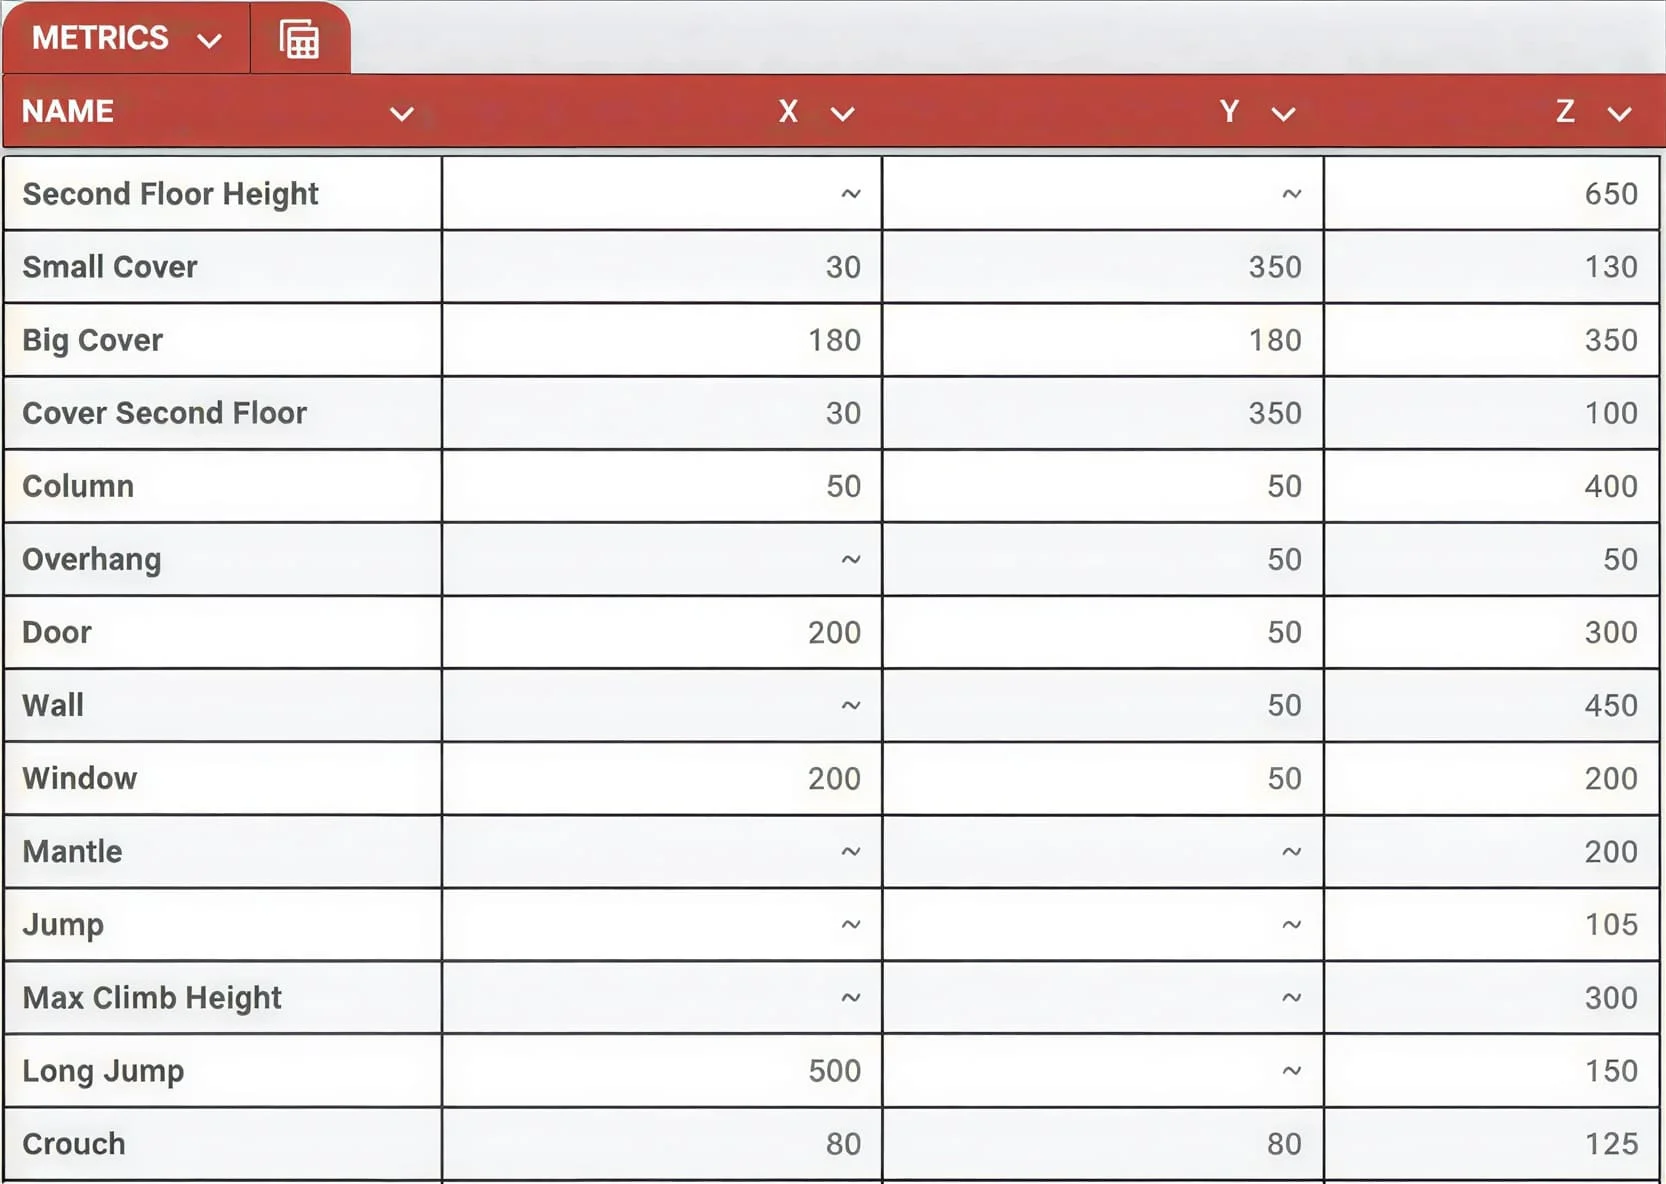
Once the theoretical foundation was in place, I moved into Unreal Engine 5 to begin production. Instead of jumping straight into the level, I first built a level gym to test and prototype the mechanics, as well as experiment with new ideas and gather metrics. These metrics were crucial at this stage, as they allowed me to define precise values for the spaces in the level and understand how the character interacts with them, such as cover height, jump distance, and overall movement capabilities. Once everything was refined and updated, I compiled all the information into a comprehensive LDD (Level Design Document).
Building on my sketches, along with the structure defined through bubble diagrams and pacing, this phase felt smooth and straightforward. I started by placing the main landmarks, creating a macro blockout with simple geometry to define layout, scale, and player paths, focusing on key points of interest and primary routes. This allowed me to quickly test the structure of the level, validate pacing and beats through early playtests, and iterate rapidly. At the same time, this phase was essential to verify how the previously defined mechanics translated into the space, ensuring their interactions and combinations worked as intended within actual gameplay scenarios. From there, I progressively refined the level, improving proportions, readability, and player movement through constant adjustments..
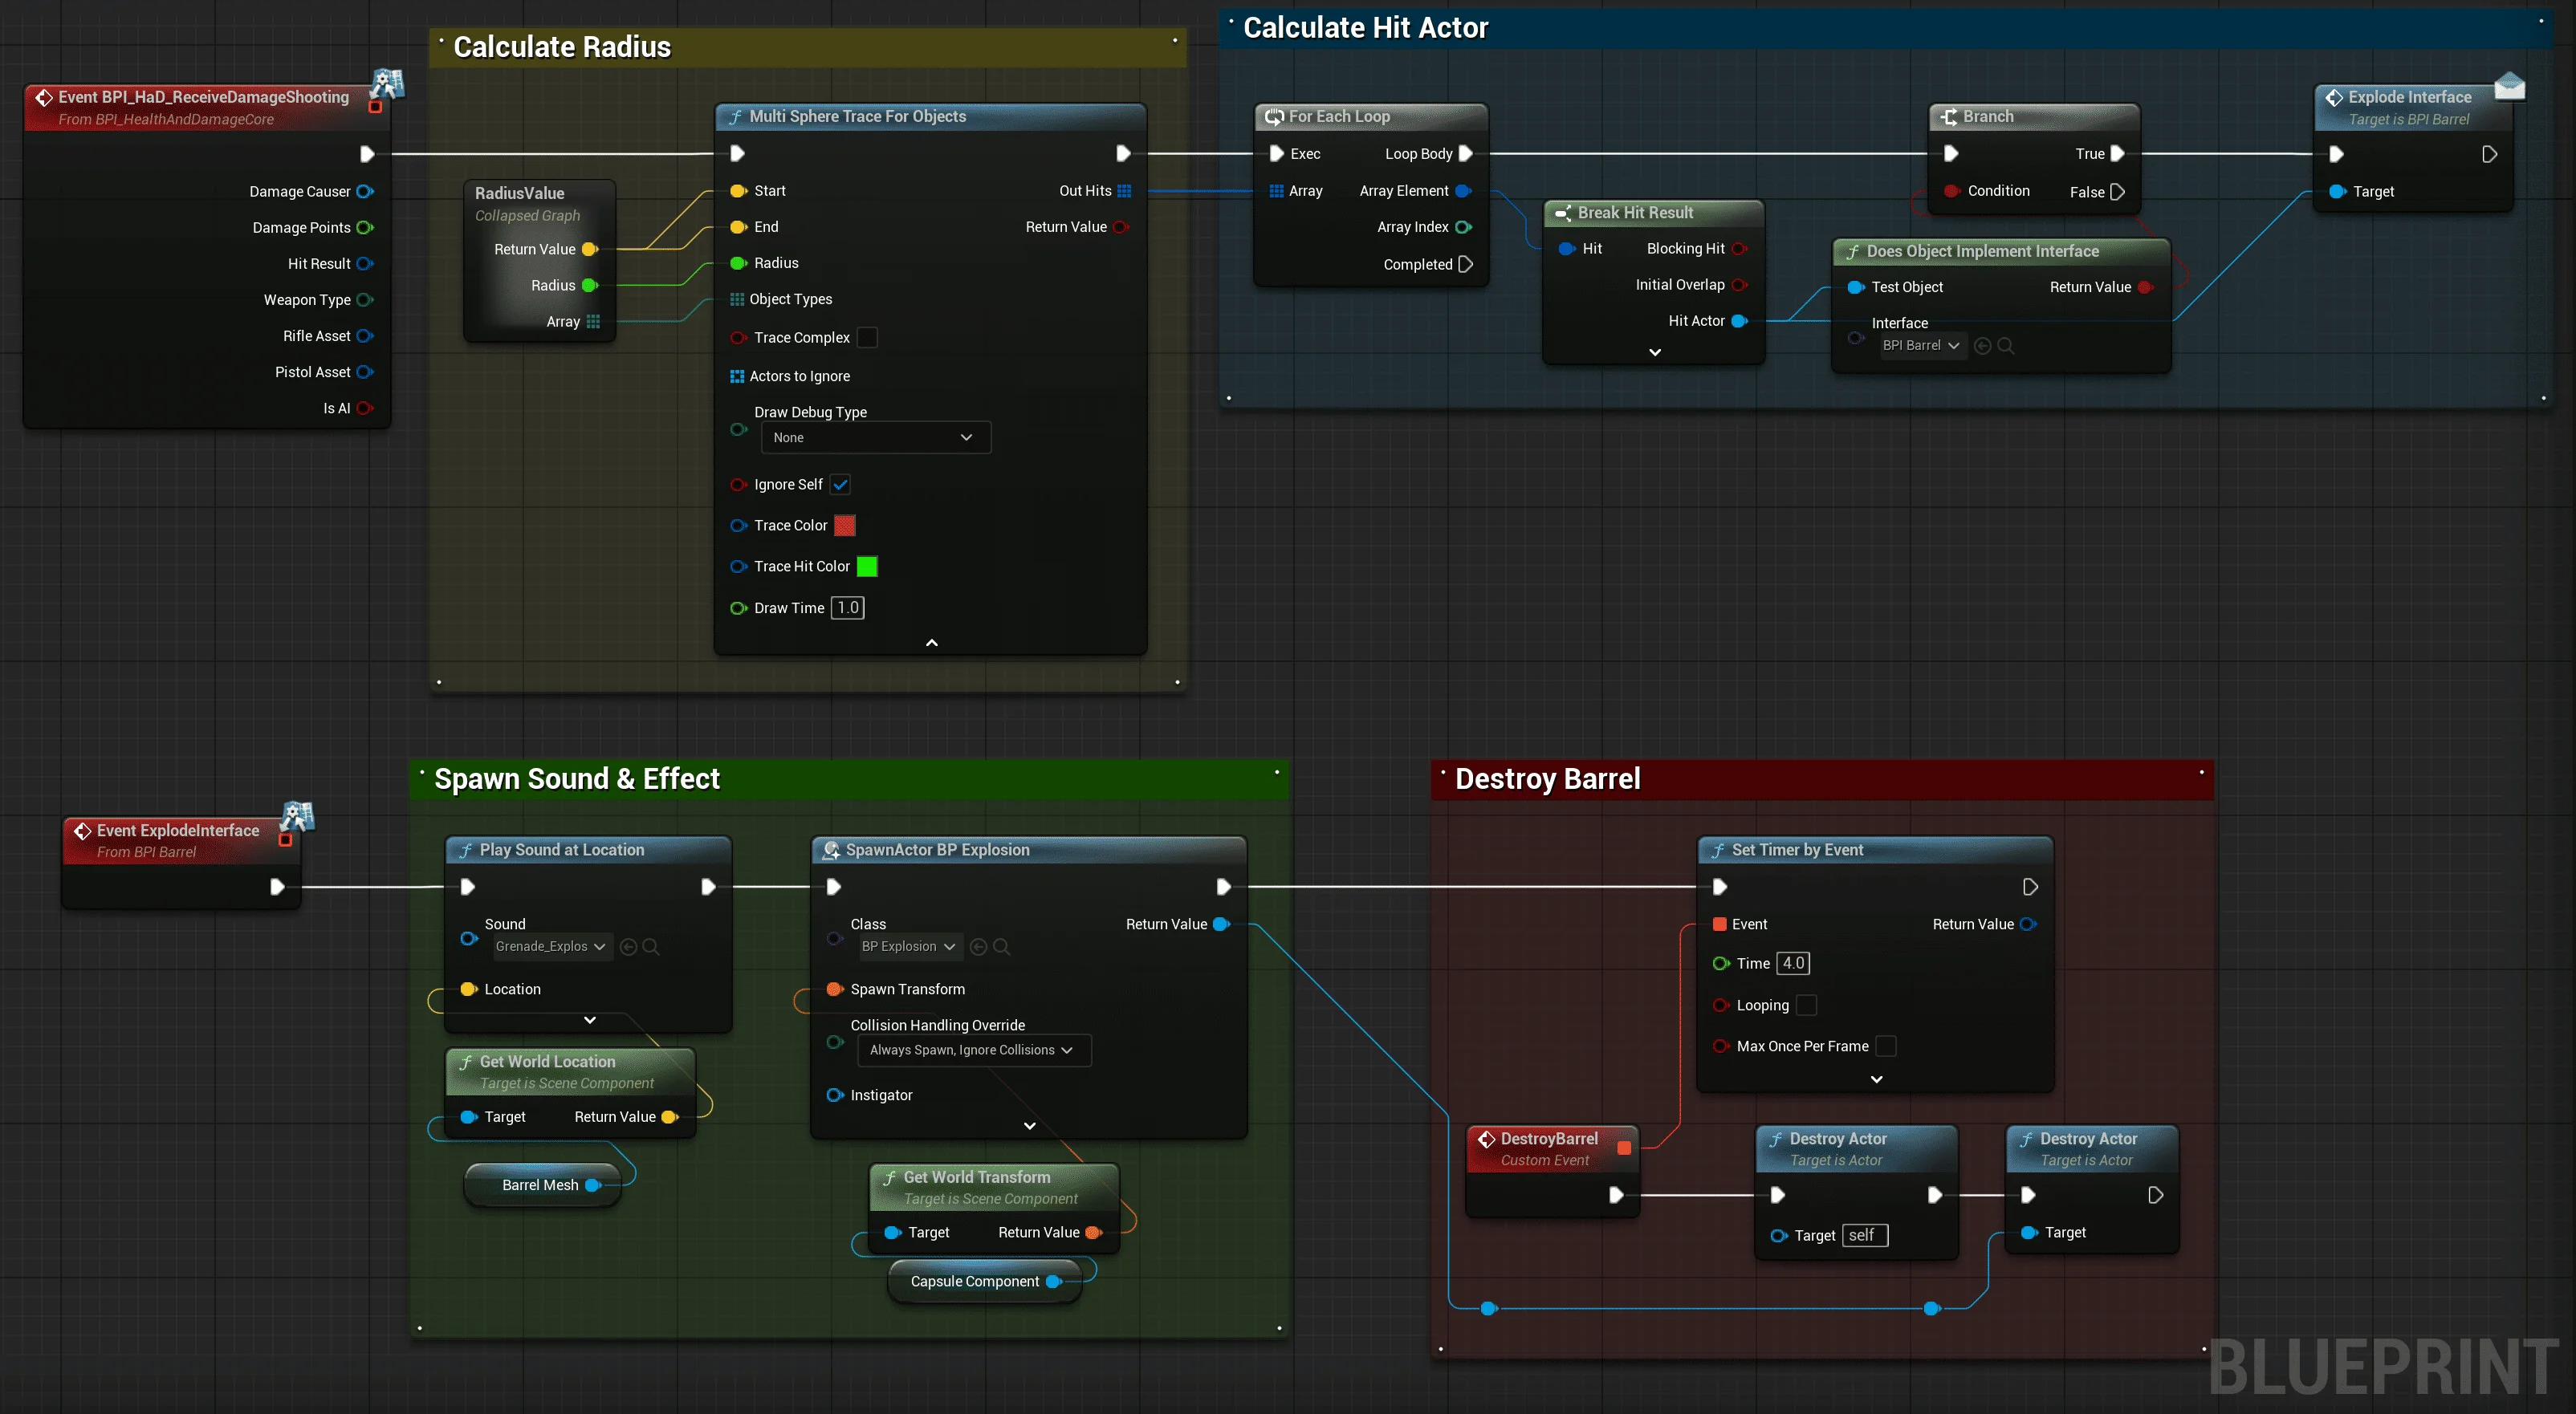
For gameplay, I primarily used Blueprints to prototype the level’s interactable objects, leveraging my knowledge to freely experiment and implement different ideas. A clear example of this is the explosive barrel, which I used to quickly test interaction, physics response, and environmental feedback. This approach allowed me to iterate fast, validate mechanics, and refine solutions while continuously improving my technical skills.
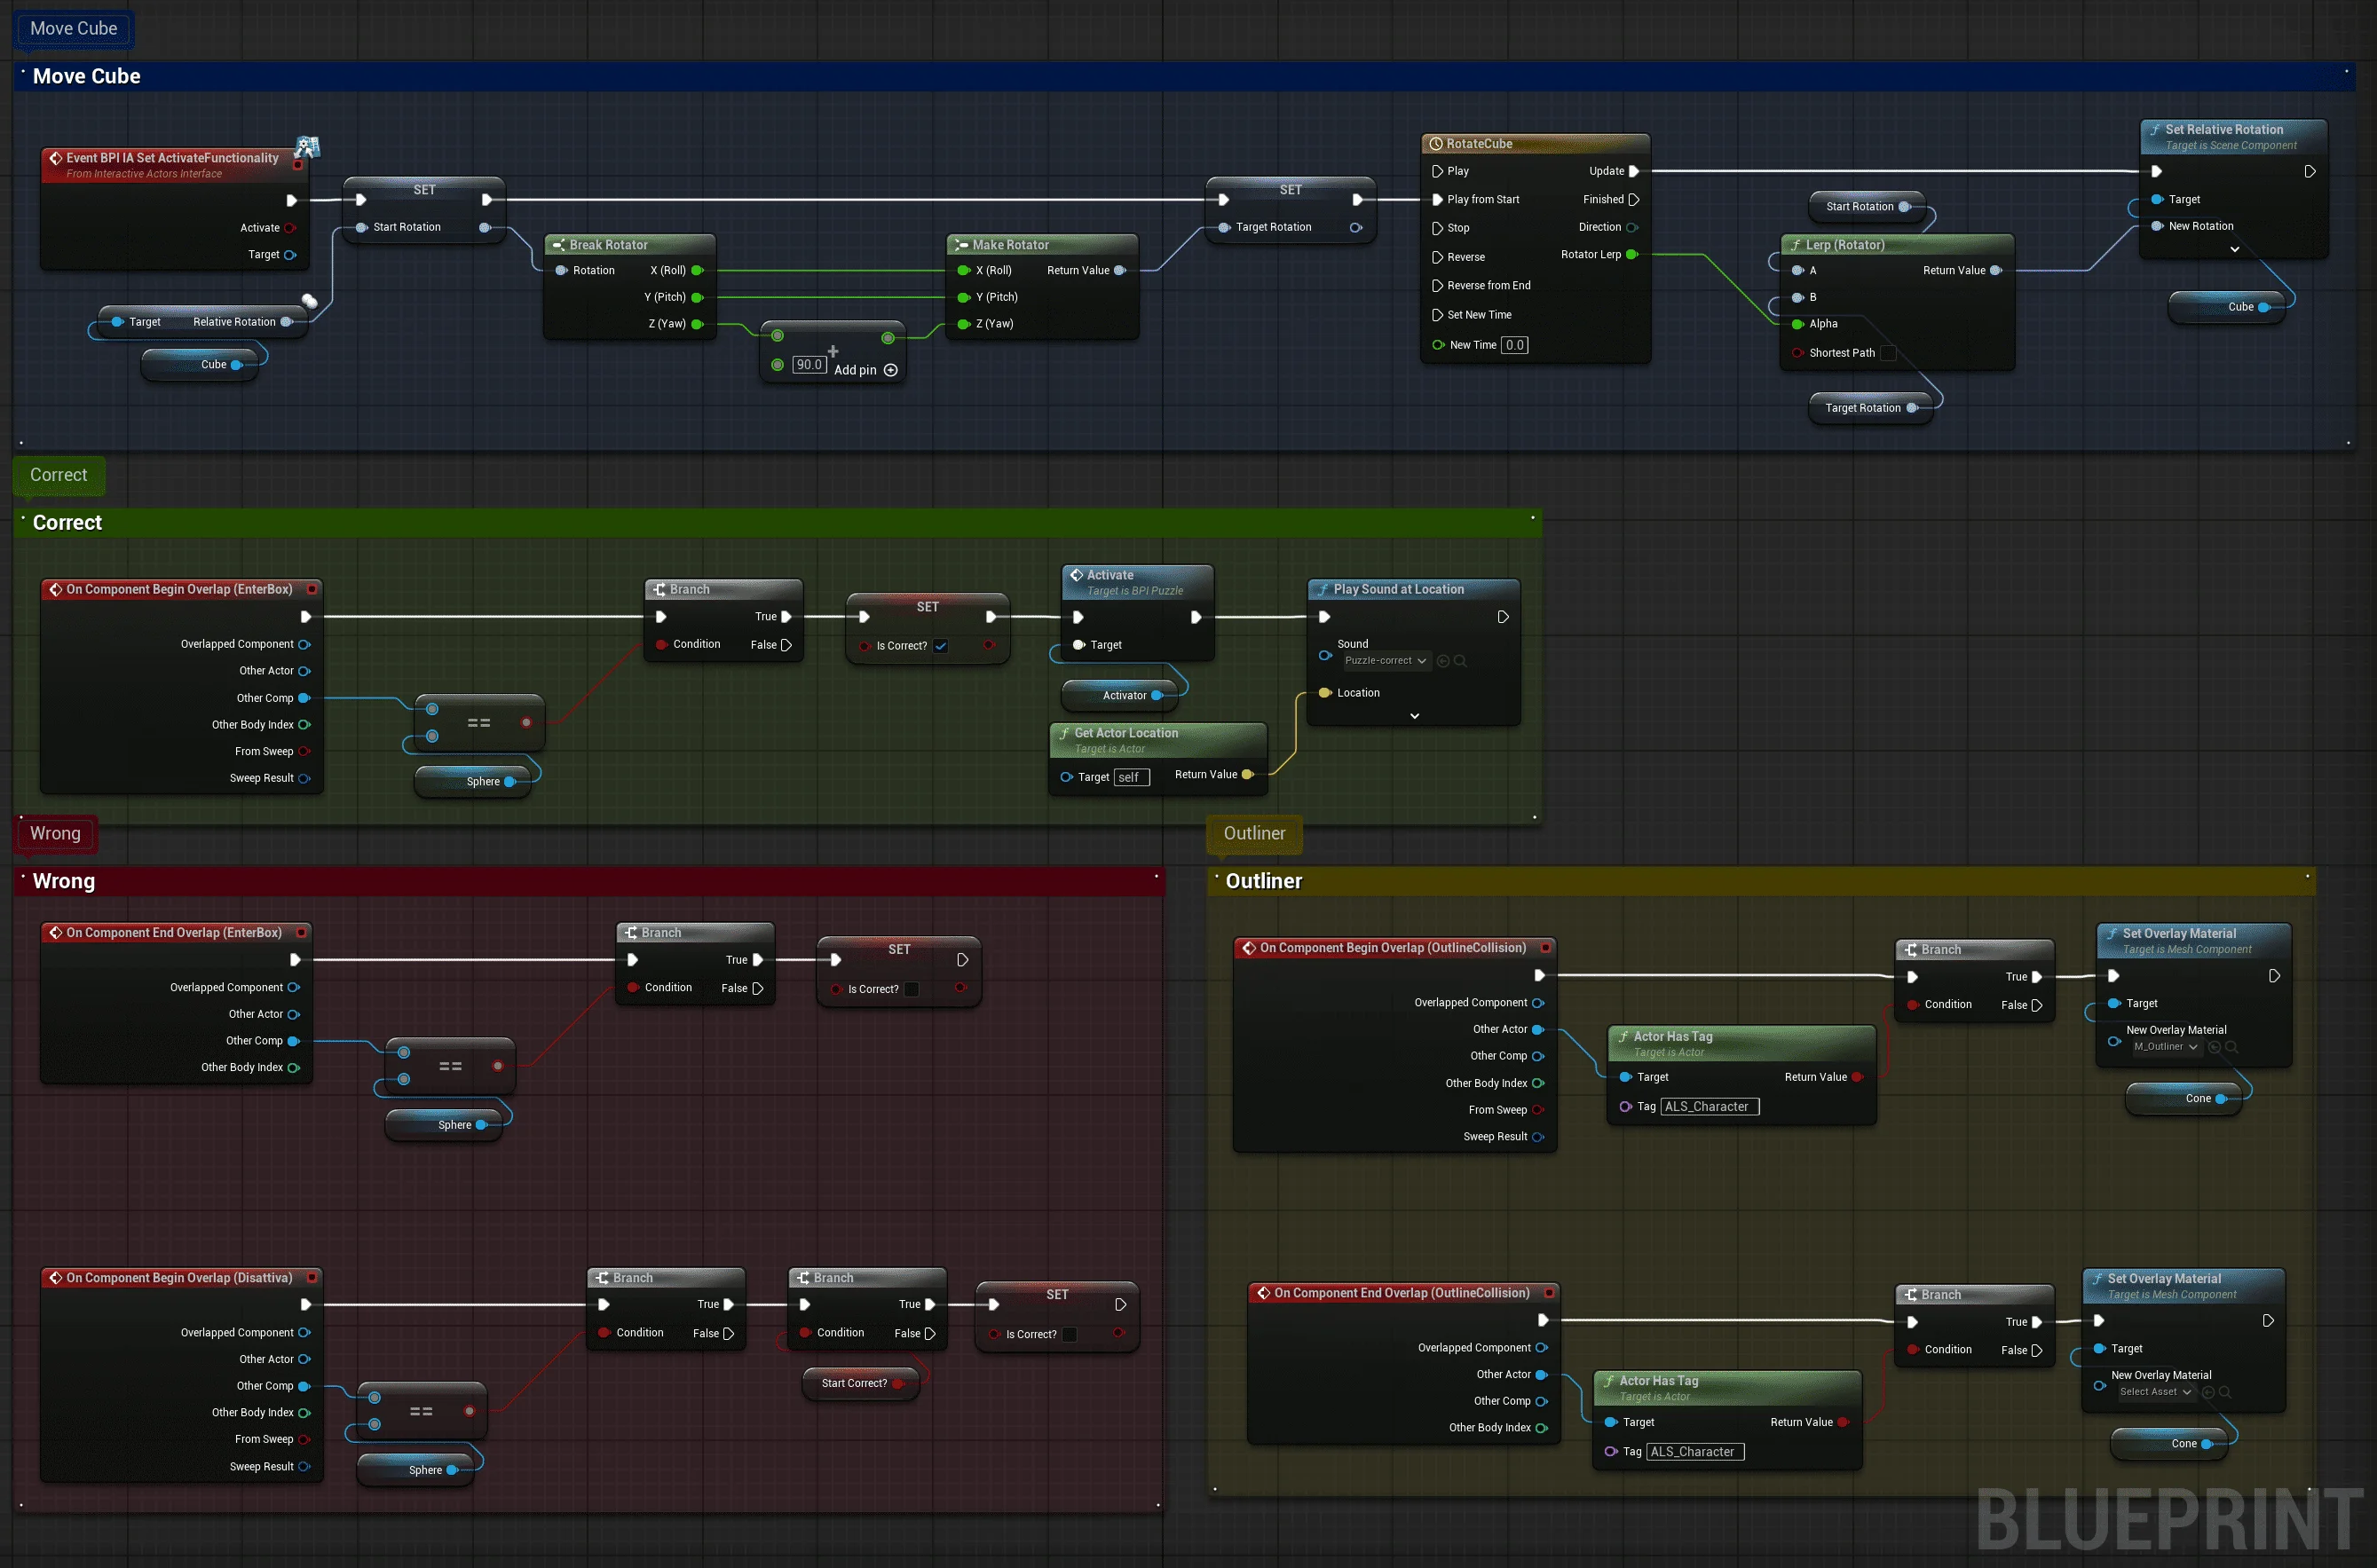
On the systemic side, I also used Blueprints with interfaces to keep the architecture modular and optimized, especially for puzzle design. In parallel, I integrated and tuned character ability values through the Gameplay Ability System (GAS), which allowed me to precisely adjust gameplay balance, responsiveness, and interaction rules for puzzle-related mechanics.
I used the Level Sequencer to create the level’s intro cutscene, establishing the narrative foundation while learning how to craft smooth and cinematic camera and object transitions. This helped me understand how timing, framing, and movement contribute to a stronger sense of storytelling inside gameplay spaces. It also allowed me to better align the opening of the level with its intended pacing and tone, ensuring an engaging introduction for the player.
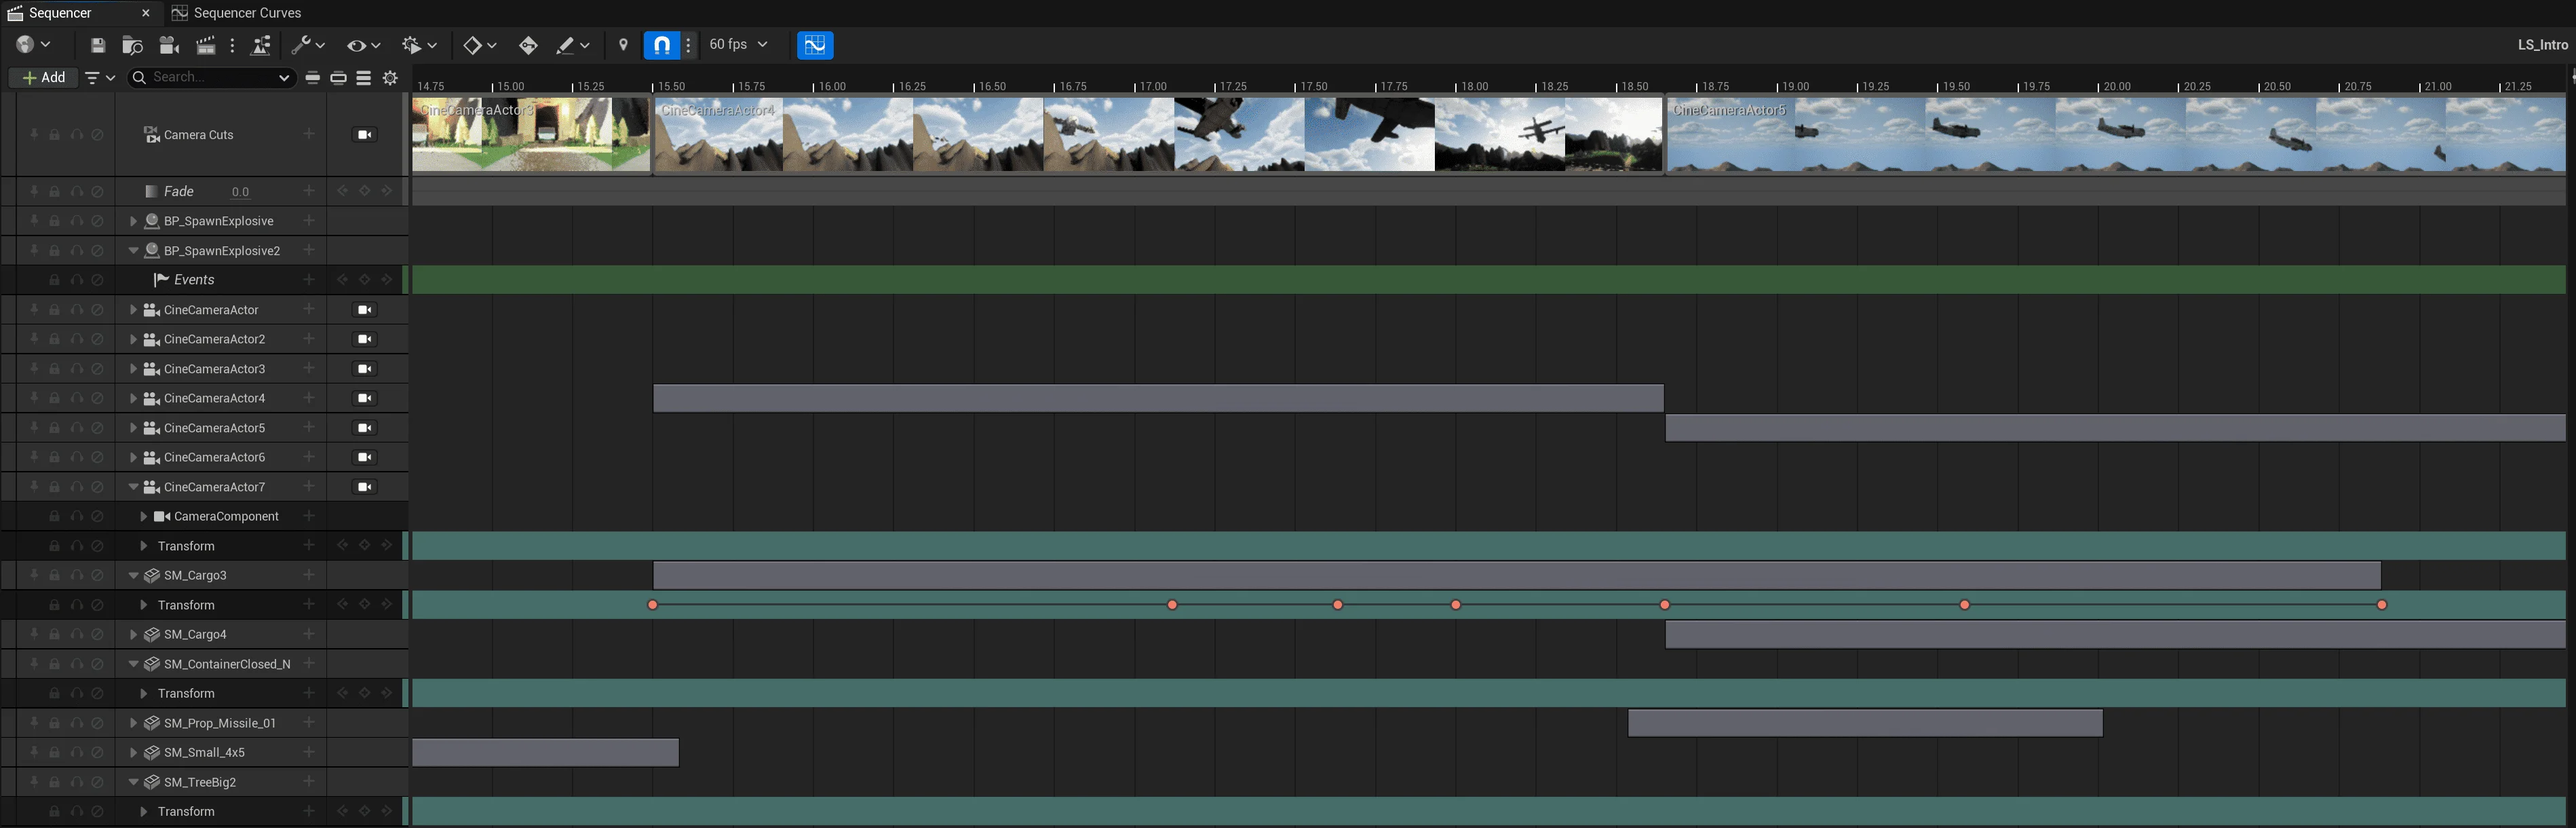
Additionally, I used the Level Sequencer for all scripted events within the level, including falling trees, a collapsing bridge , and the movement of mountain cliffs. This project gave me a clear understanding of how powerful Sequencer is for managing complex in-game events, and it provided experience that I will directly apply in future productions.
Throughout the entire production, I continuously ran playtests, not only with friends but also with experienced level designers who helped me stay on track and push the level toward the best possible result. I used Google Forms to collect detailed feedback, allowing me to track what worked and what didn’t through structured data. During playtests, a few issues emerged, mainly related to pacing slowing down too much in the middle of the level, some mechanics not being fully utilized, and combat being introduced a bit too late compared to the rest of the experience. I resolved these issues by revisiting my pre-production documents and adjusting the level based on feedback. I moved the first combat earlier, adding a small temple after the tutorial for a balanced, approachable start. I refined the mechanics throughout, creating multiple ways for the player to tackle challenges and exercise agency. Finally, I redesigned the second arena to be visible from afar, which smoothed the mid-level pacing and made the experience more fluid and engaging.
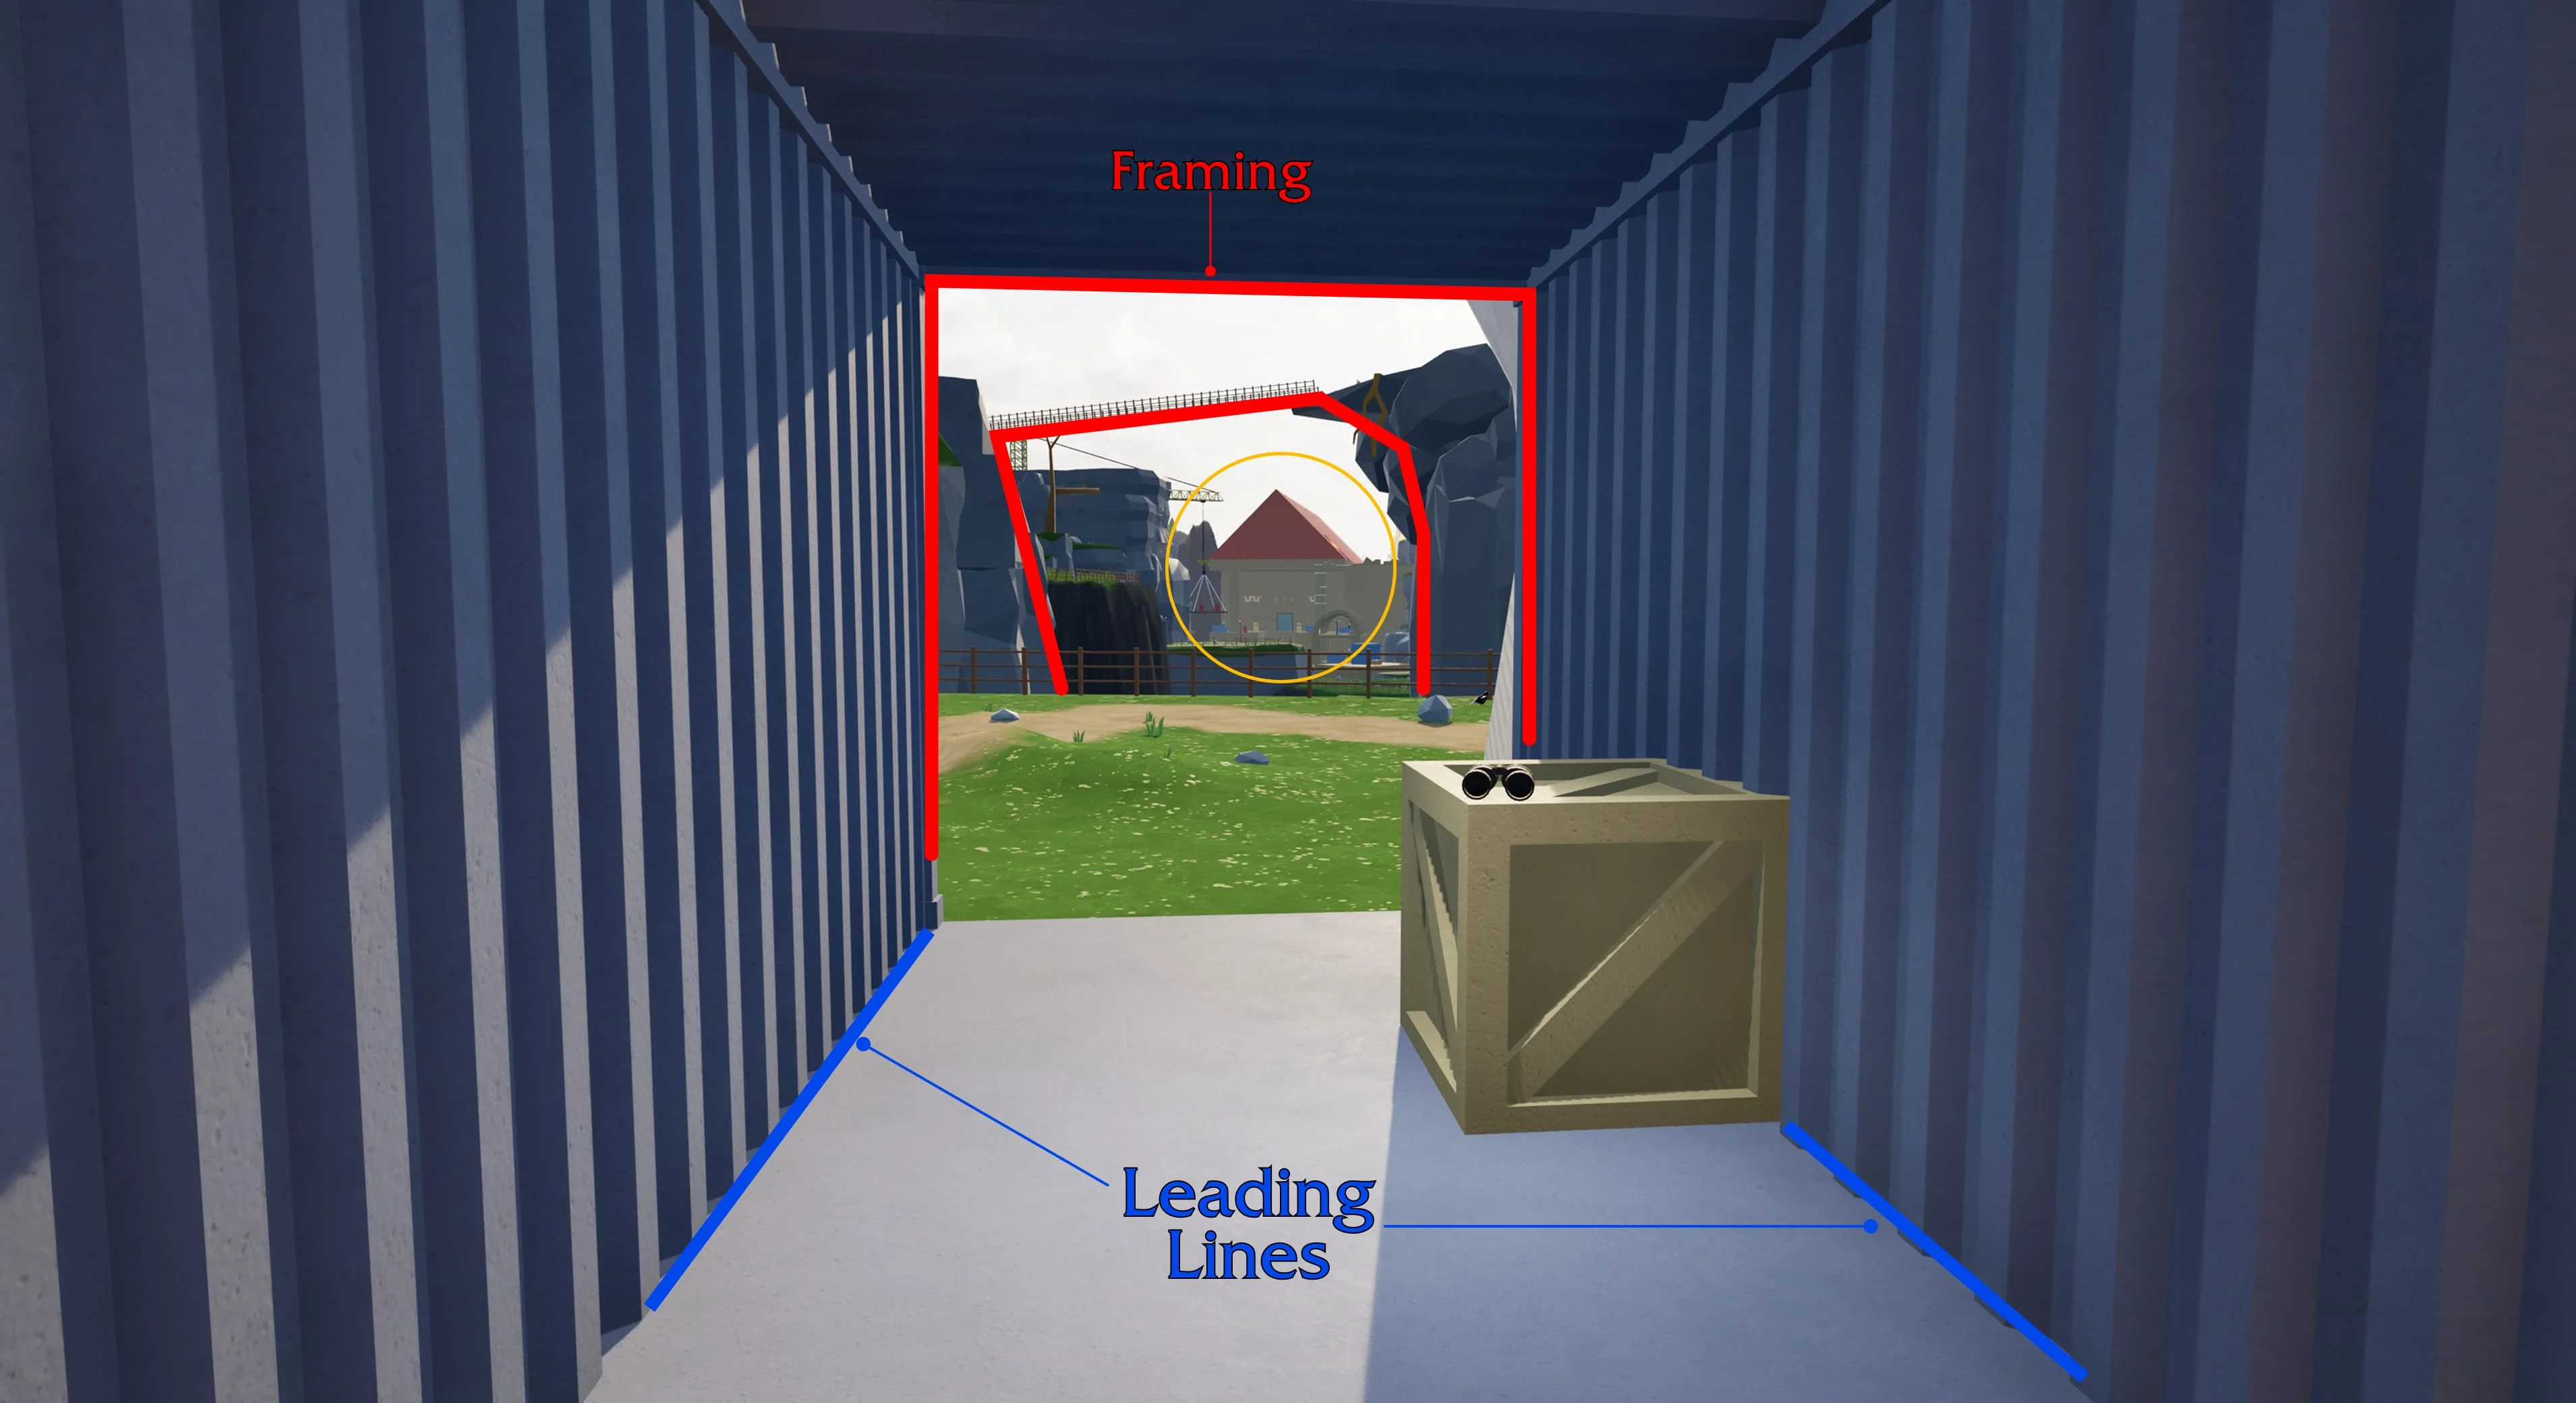
To emphasize the importance of the objective early on, I used framing to draw the player’s attention toward the area, while leading lines in the environment subtly guide the player in that direction and support natural navigation without forcing it.
I used the temple as the main landmark, clearly visible from the start. It guides the player without the need for a map and supports constant orientation, while appearing progressively closer to reinforce a sense of progression.
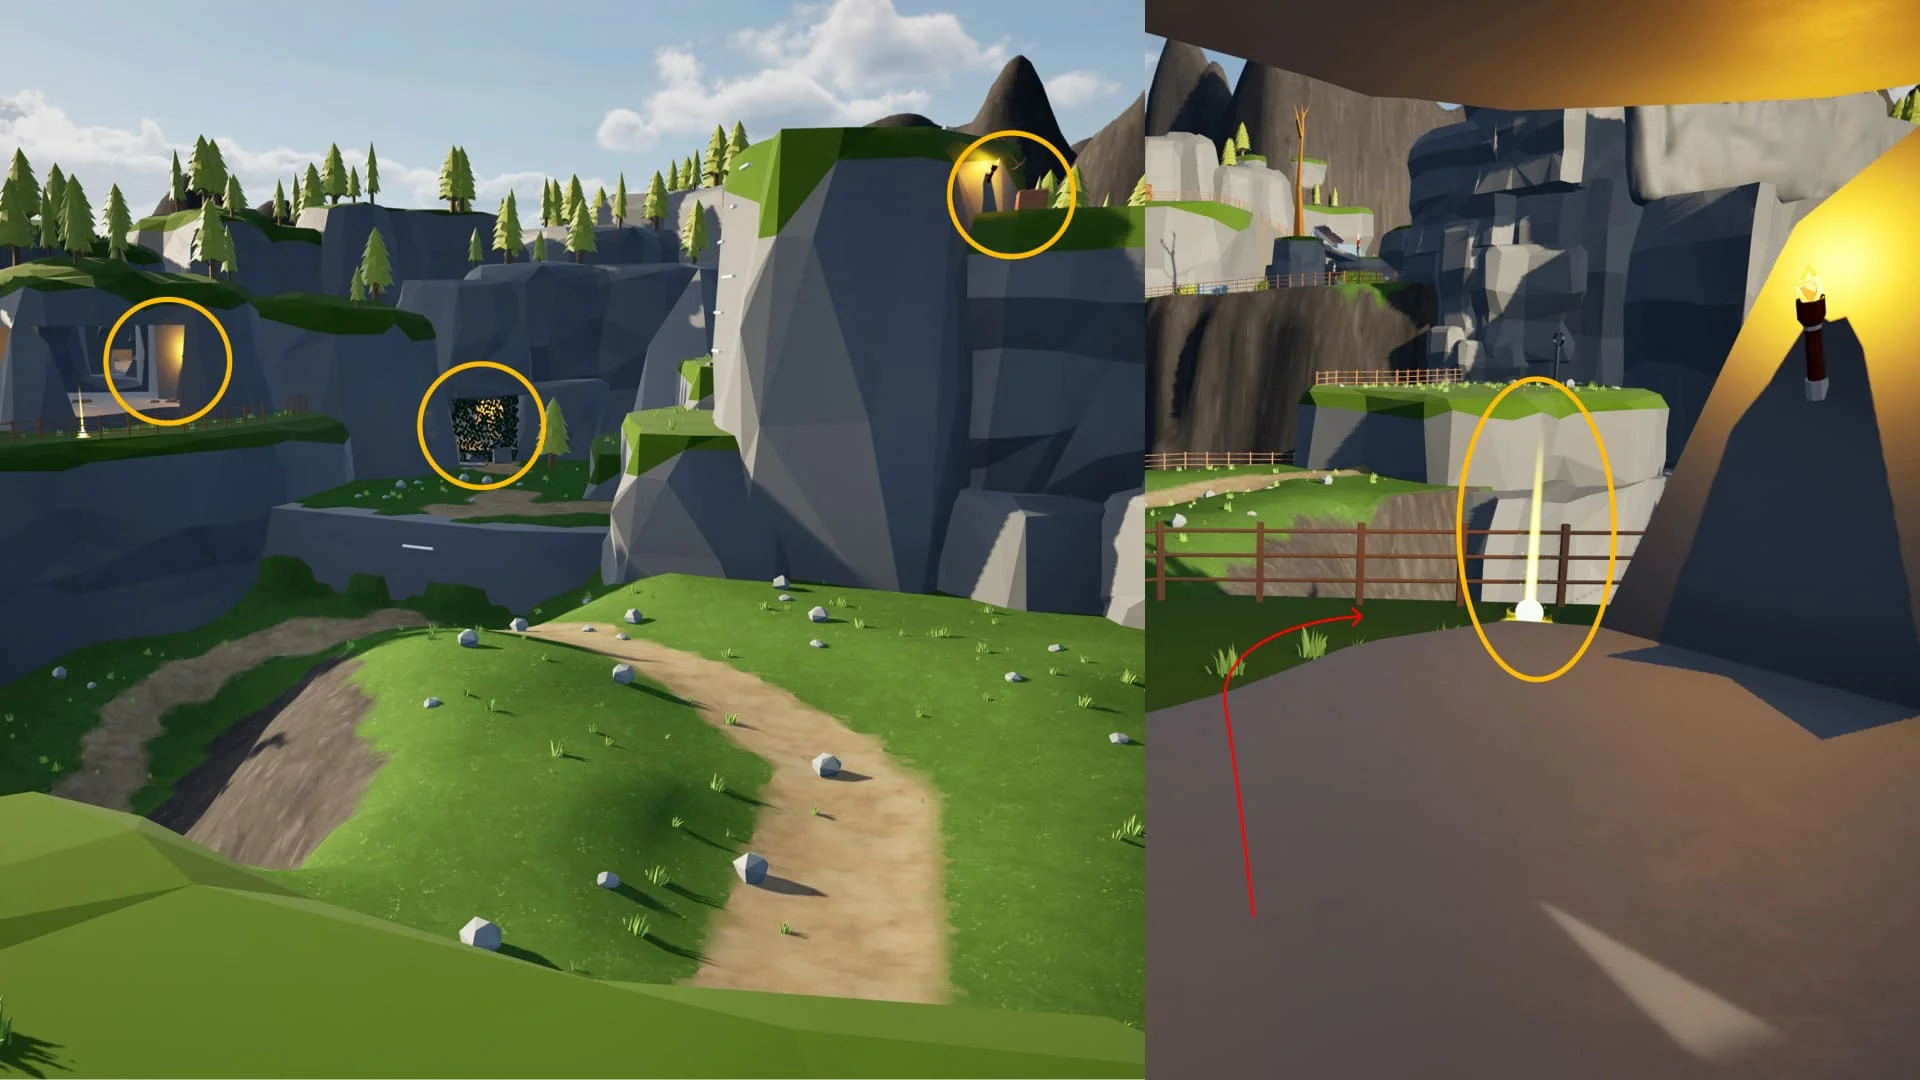
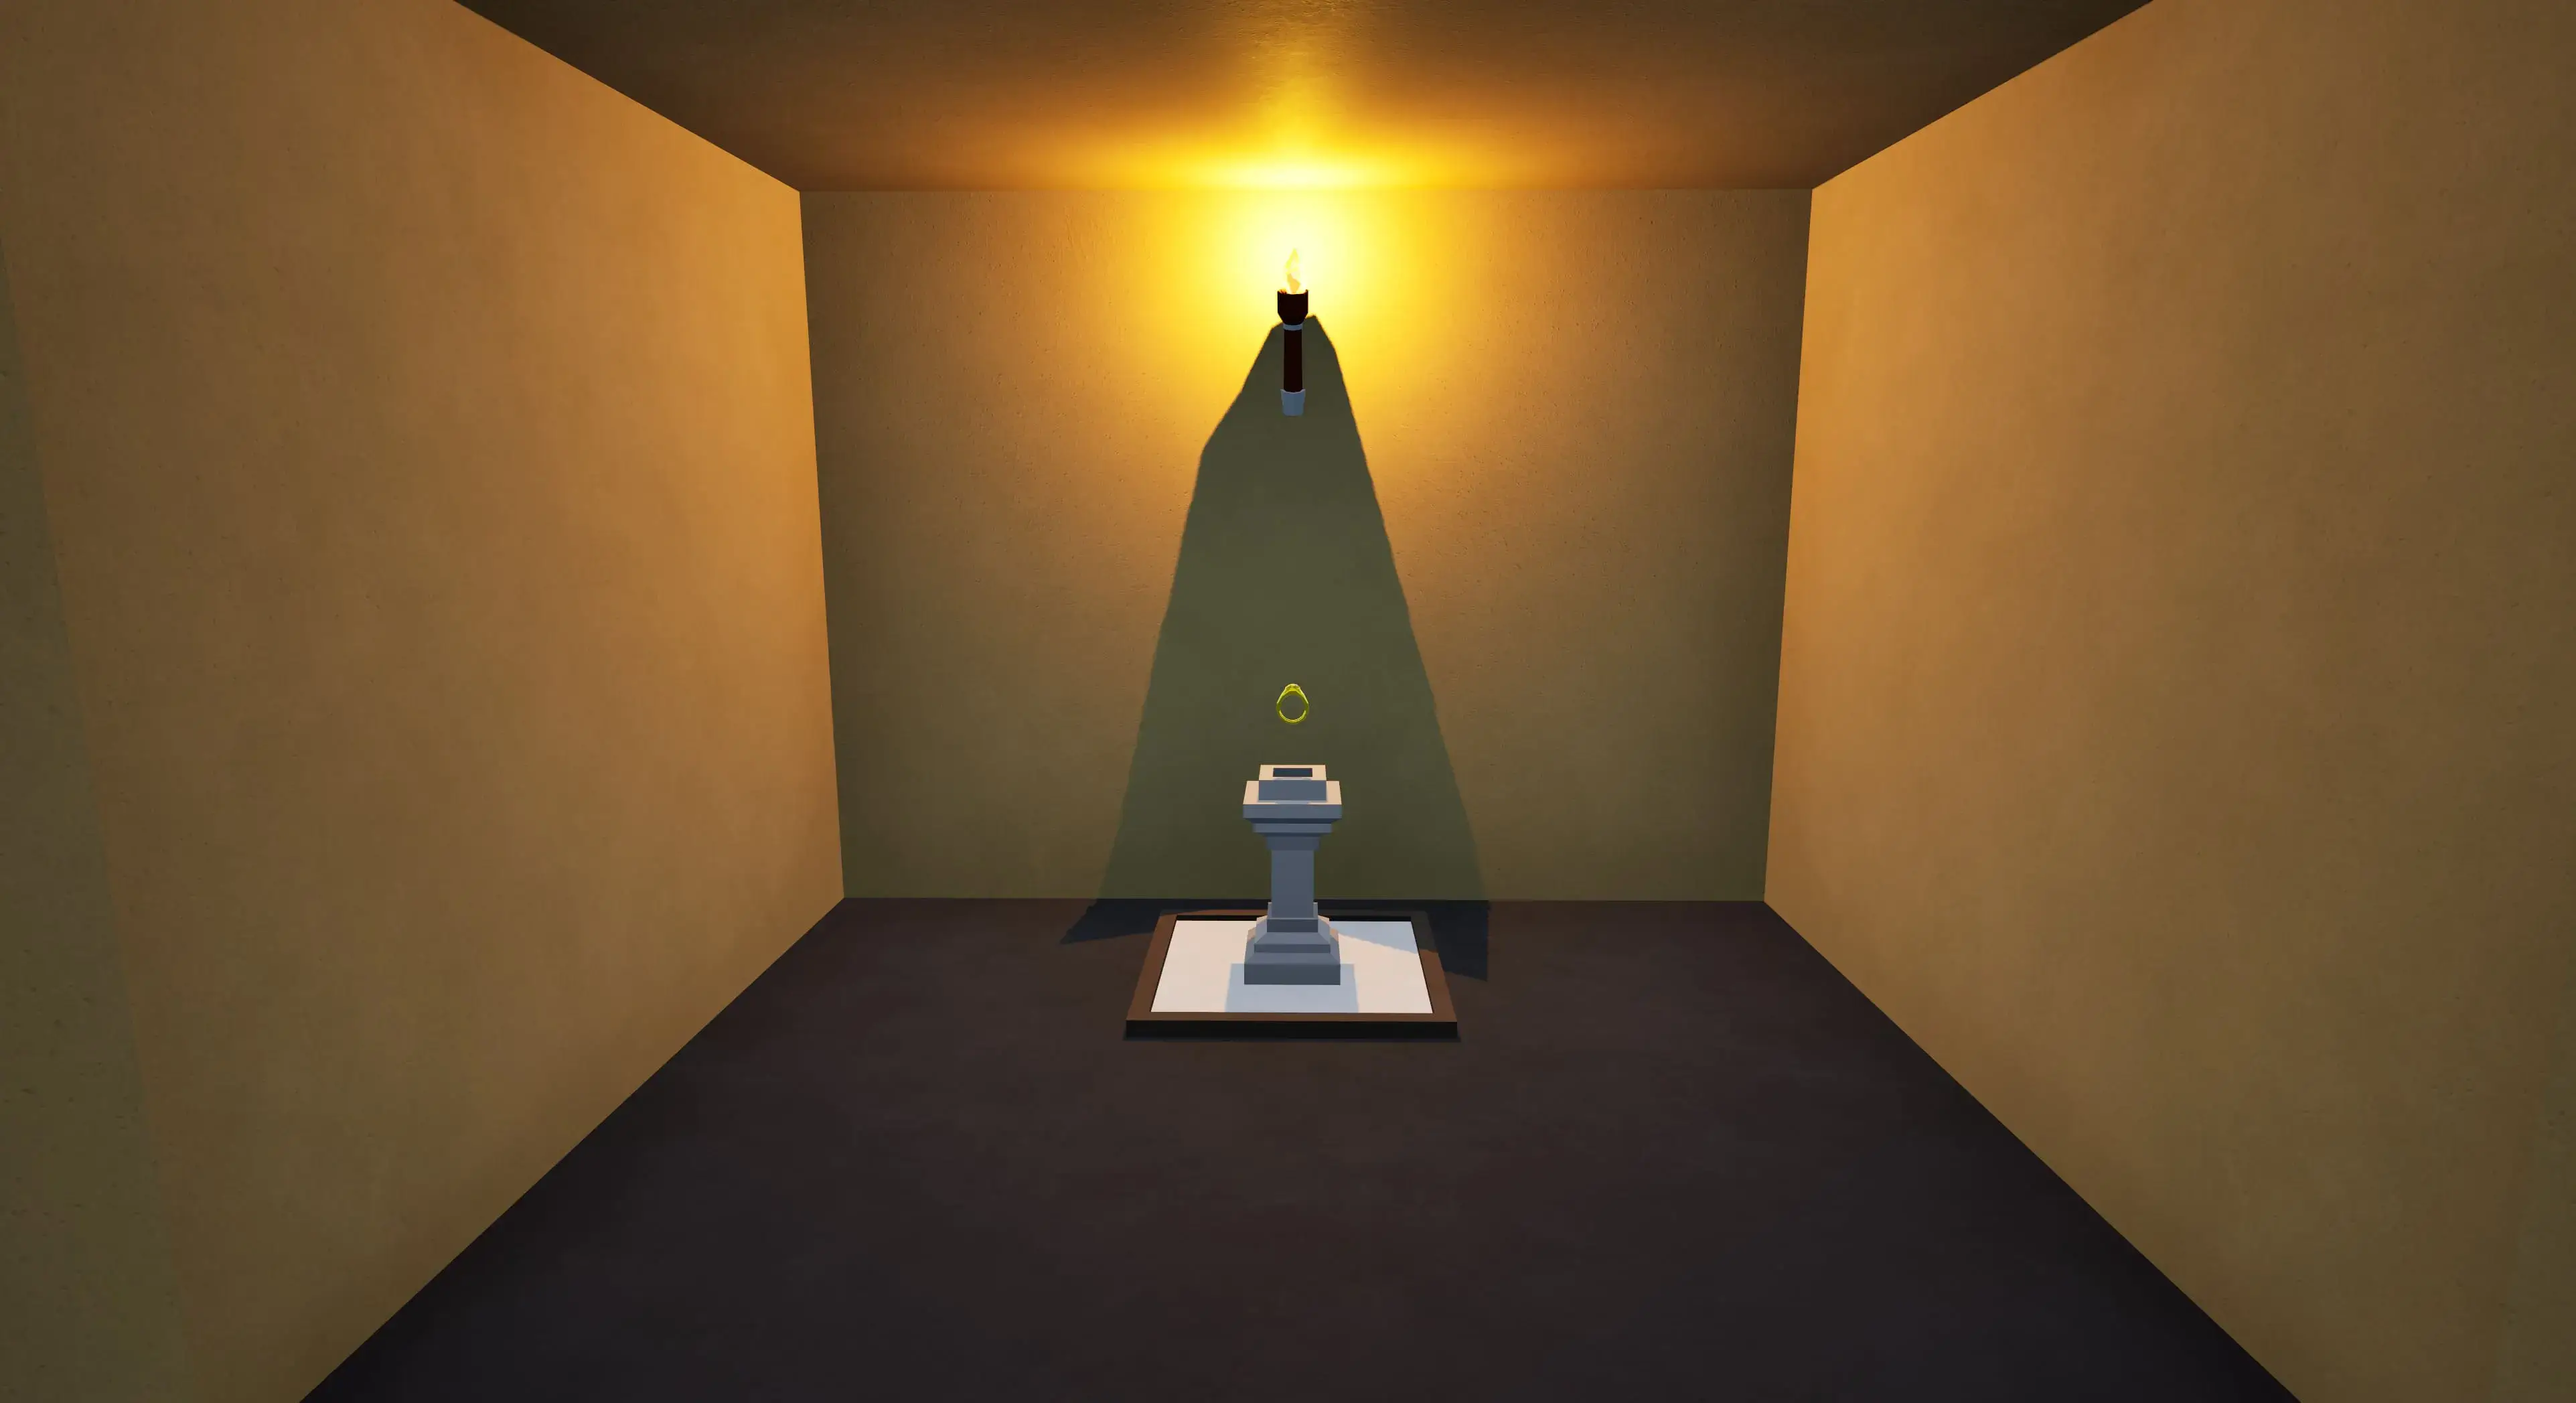
I used torches and natural lighting to guide the player through both main and secondary paths, subtly highlighting points of interest and navigation options. Collectible treasures act as illuminated breadcrumbs, encouraging exploration and naturally leading players toward optional routes without forcing them.
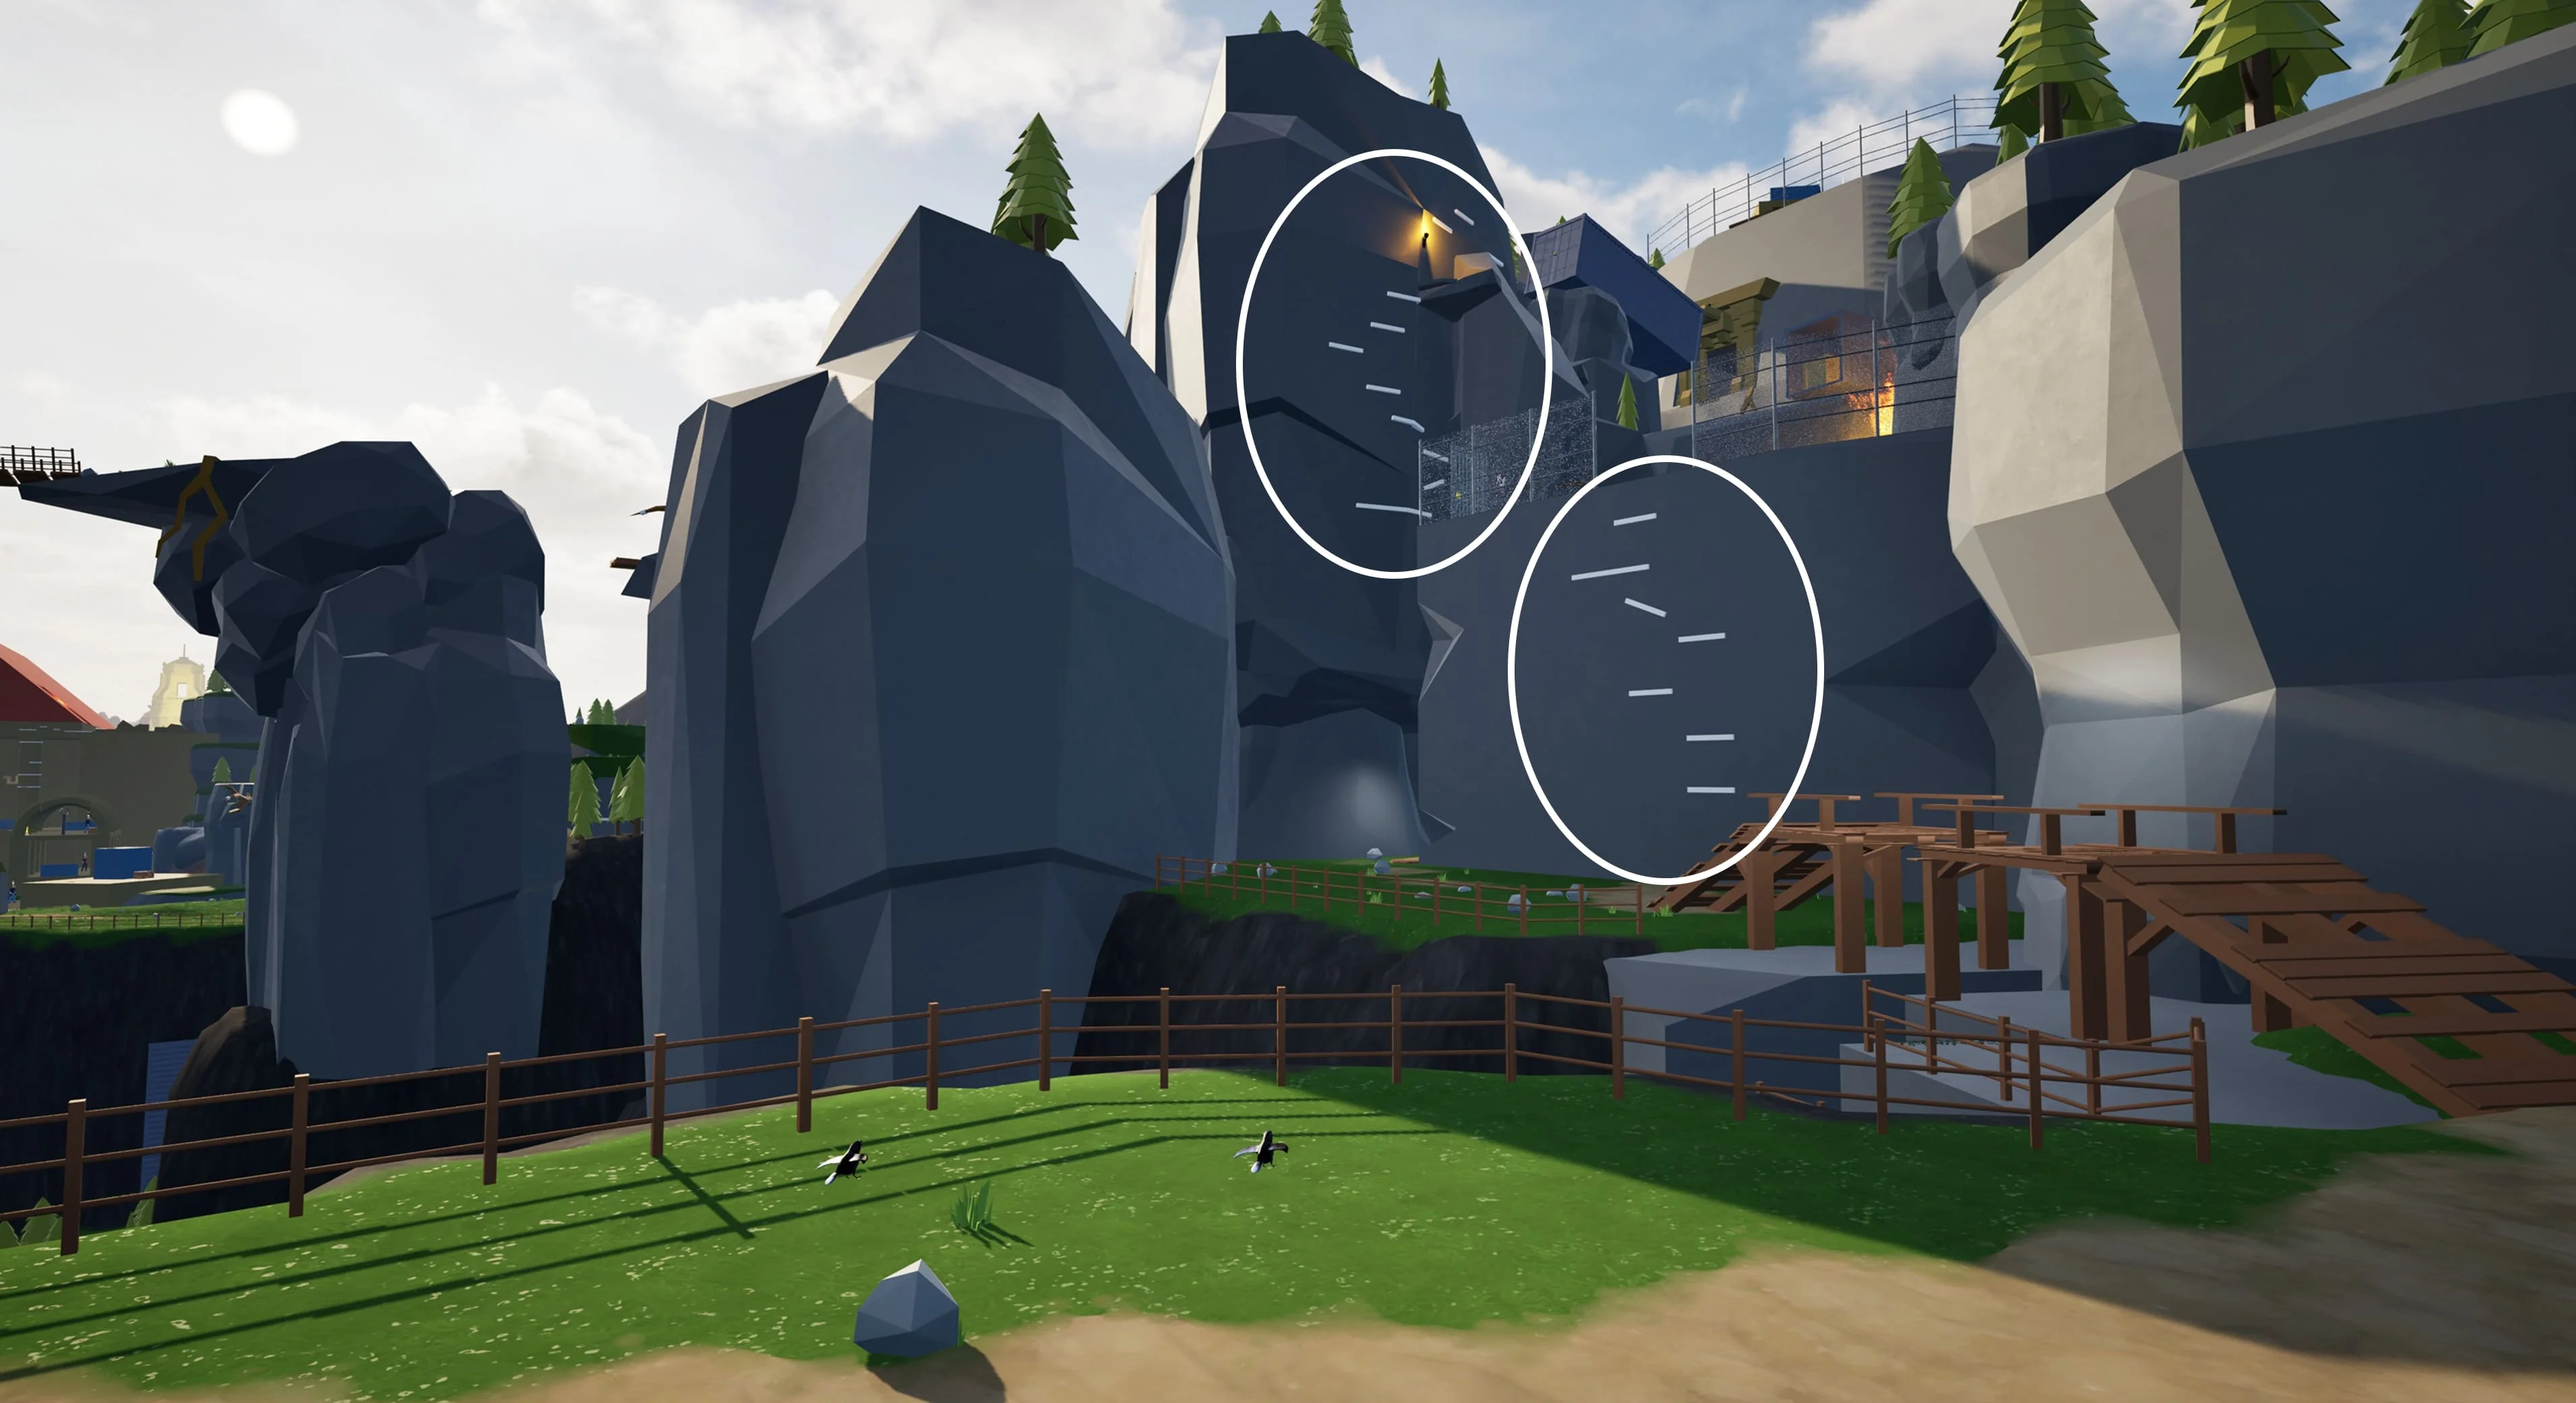
By using white as the key affordance color, the player quickly learns what elements they can interact with or use to move through the environment, such as climbing, mantling or zipping. This creates a clear visual language that guides player behavior naturally.
I used movement to naturally draw the player’s attention, placing birds that fly away as the player approaches and using explosions to create sudden visual cues. Both elements catch the eye and instinctively guide the player toward points of interest.

Before each combat encounter, I placed the player in an elevated vantage point above the enemies, allowing them to observe patrol patterns, assess the layout, and plan their approach before engaging.
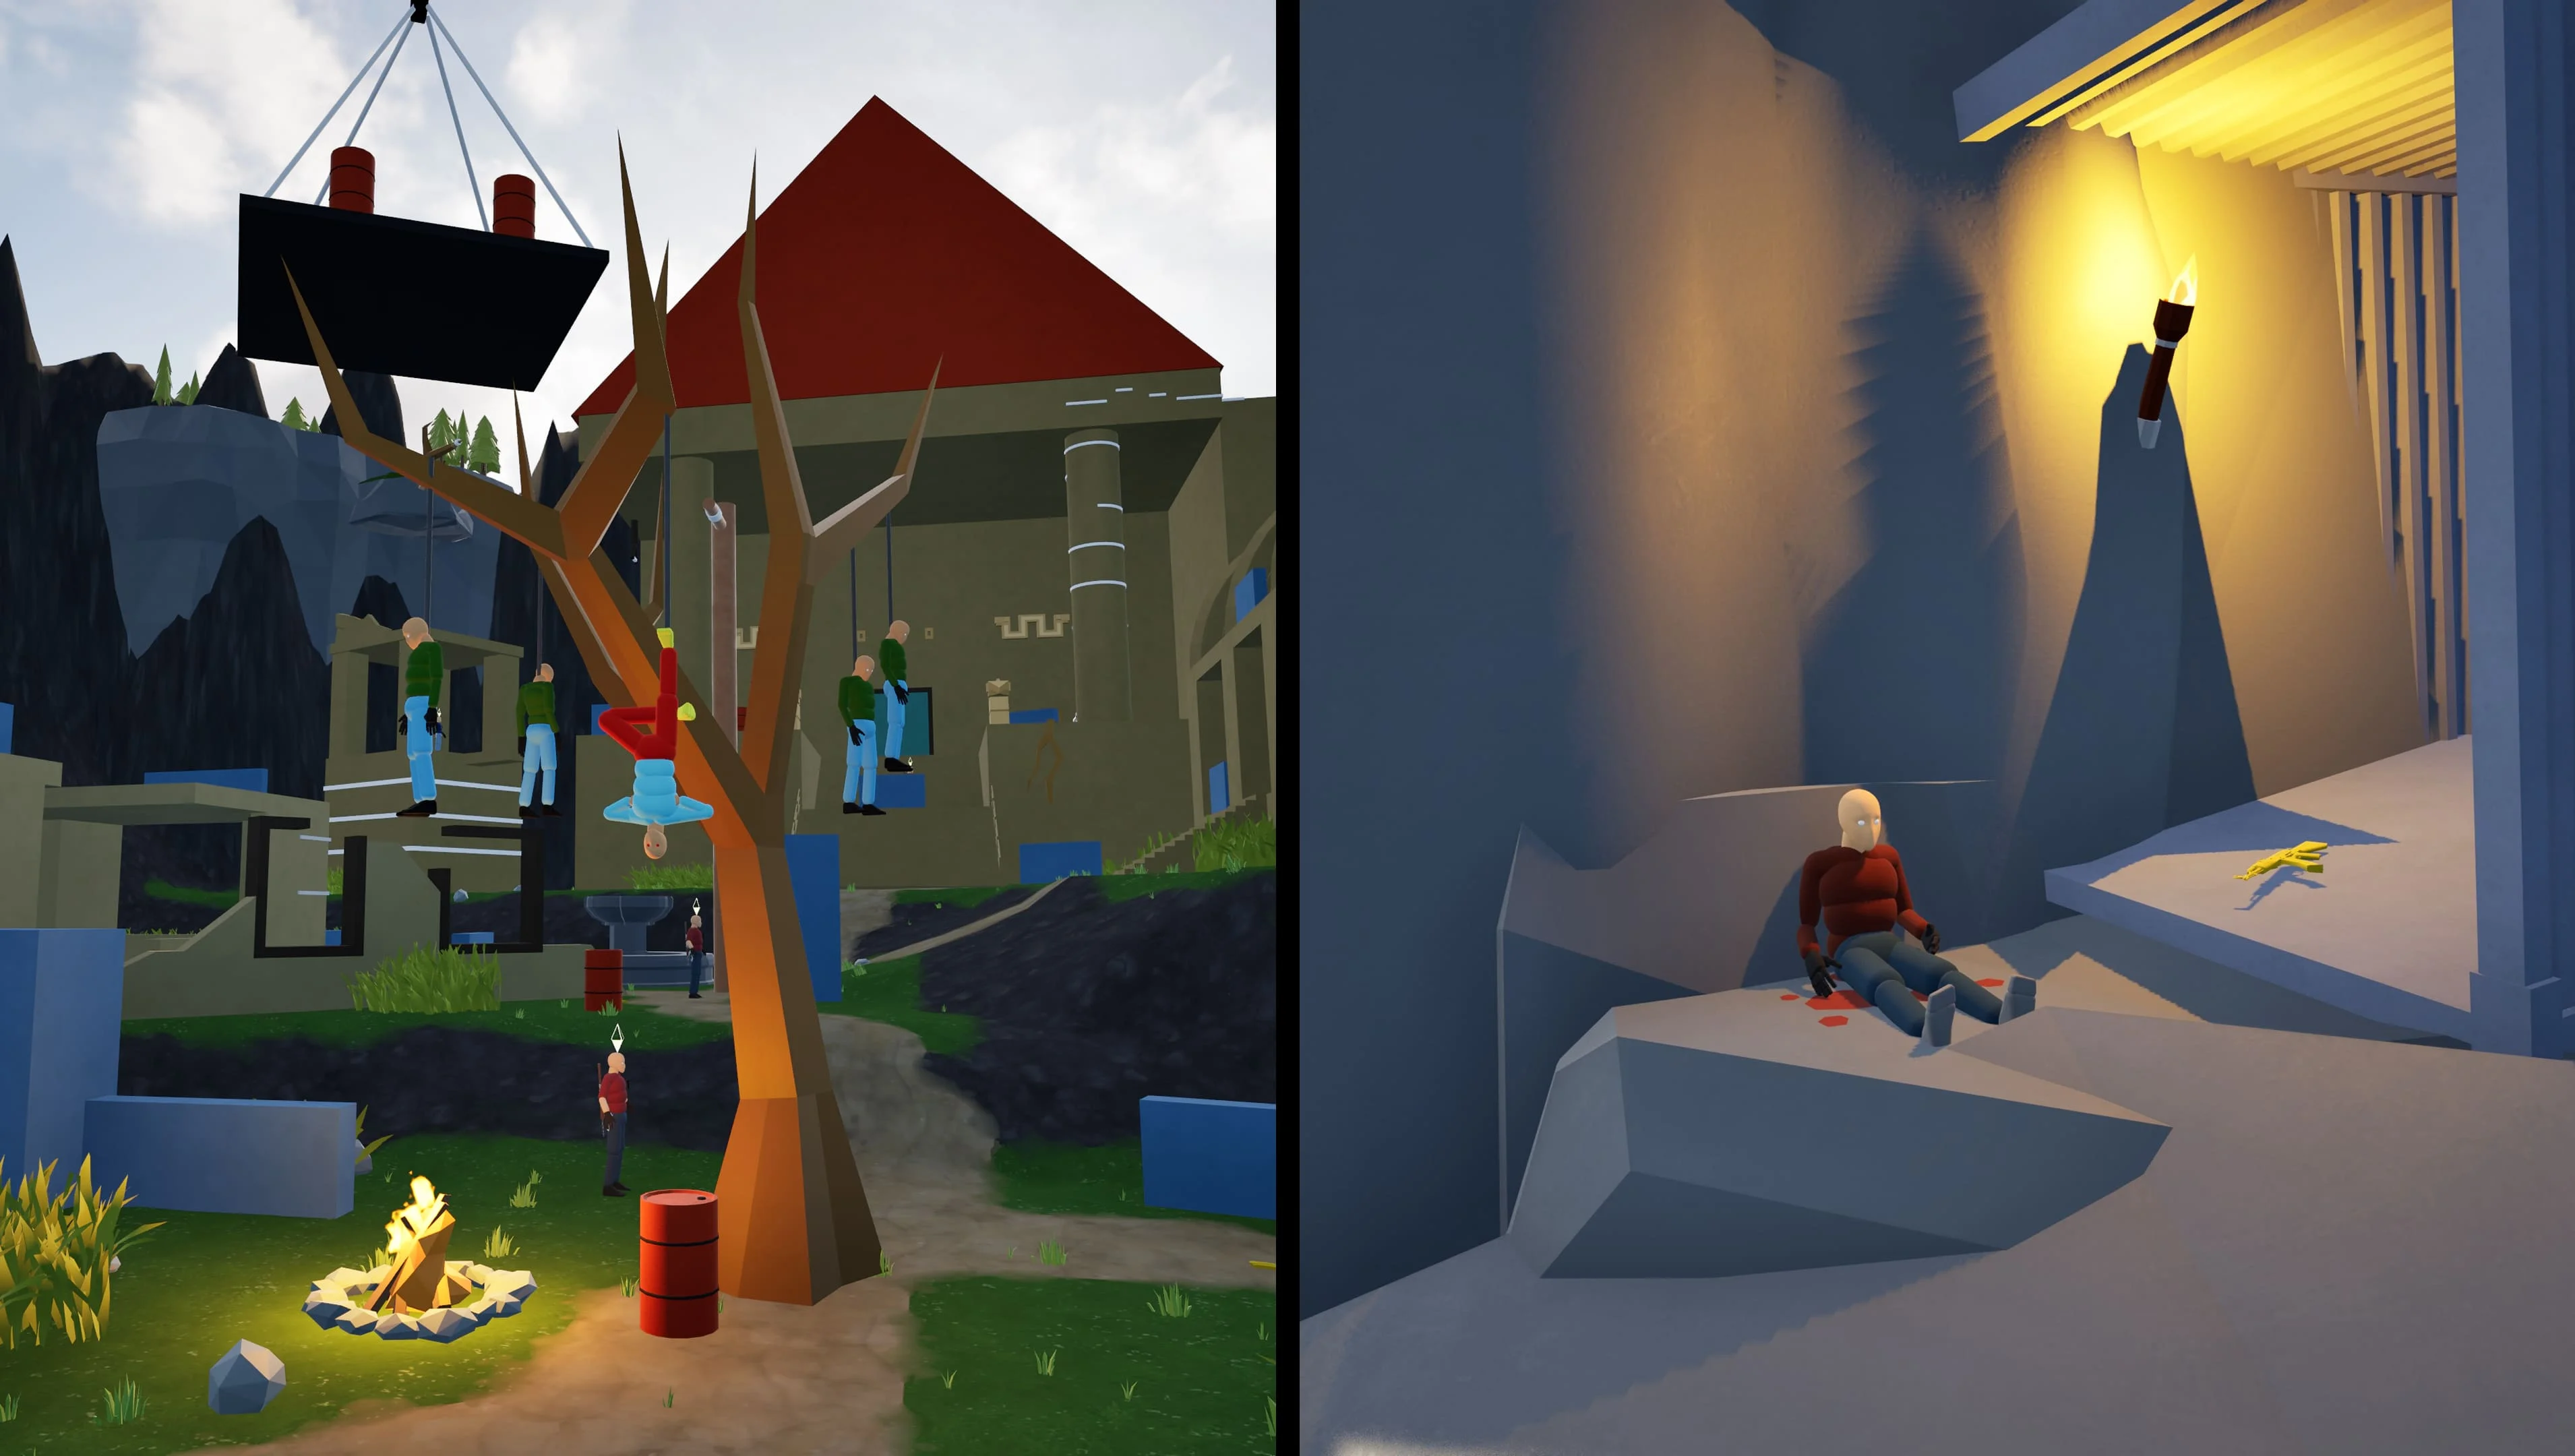
The level is set in a war-torn area with rival factions, aerial skirmishes, and explosions. Beyond radio dialogue, I told the story through the environment itself, showing the aftermath of battles, destruction, and scattered bodies to convey what happened without using words.
I designed the level’s layout to subtly funnel the player toward key areas without feeling forced, using environmental cues, obstacles, and sightlines. Exiting each funnel then reveals a sense of openness, giving the player a rewarding view of the surrounding landscape.
Set pieces are highly memorable moments that make a level feel unique and impactful. In my level, I included a collapsing bridge that the player crosses mid-fall, and a high-intensity car chase where enemies shoot and pursue the player, creating thrilling, unforgettable experiences.
The project was intense and at times exhausting, but it taught me a great deal and ultimately turned out exactly as I envisioned. Looking back, I could have managed some parts of the pacing tweaks earlier, but overall the process was extremely valuable. Keeping track of tasks throughout the project helped me stay organized and on track, and I genuinely enjoyed the process while learning a lot. I had the chance to meet many talented people along the way, and the experience reinforced how crucial pre-production is. Playtesting proved essential, as it completely shaped the level and helped me achieve the best possible version. Thanks for reading!